Lima Shield documentation: user guide and technical specifications

Contents

The Lima Shield

About Lima Shield

LIMA SHIELD is an anti-intrusion sound shield designed by a French company: Lima Groupe, an integrated security group founded in 2022, whose teams have backgrounds in the army, the police and private security.

An alarm detects and alerts. The Lima Shield acts while the intrusion is under way: as soon as it is confirmed, it can first warn the intruder with a sequence of beeps, then it floods the space with a sound designed to make them flee. Active protection, without contact and without direct confrontation.

Technology of military origin, regulated for civilian use

The sound can be set from 86 to 138 dB and is emitted in sequence, alternating with pauses. A 10-second delay gives you time to disarm before any sound is emitted.

A secure app

Lima Shield's communications are encrypted and have undergone a cybersecurity audit by the Lima Cyber teams, so that no third party can take control of the device remotely.

An award-winning innovation

LIMA SHIELD received the Audience Award at the Nuit de la Sécurité Globale 2025, organised by Républik Group. Nearly €1 million has been invested in research and development, and the product is designed to last 10 years.
Read our story

The Lima Shield

Power and sound

The Lima Shield's sound output can be set from 86 to 138 dB. It is emitted in sequence, alternating with pauses, for the duration you choose in the app.

Power
86 to 138 dB, adjustable
Frequency
2 to 5 kHz band, where the human ear is most sensitive
Modulation
Several times per second, to prevent habituation
Coverage
70 to 100 m² per unit, depending on the configuration and the acoustics of the space
Warning
Optional sequence of beeps before any sound is emitted
Delay
10 seconds, giving you time to disarm
Emission
In sequence: the sound alternates with pauses
Duration
Adjustable in the app, “Alarm” tab

The Lima Shield

Dimensions, weight and installation

The Lima Shield measures 29 × 26 × 16 cm and weighs about 7 kg. It can stand on a piece of furniture or a shelf, or be wall-mounted on its bracket.

Dimensions
29 × 26 × 16 cm
Weight
About 7 kg
Protection
IP54: resistant to dust and moisture
Installation
Free-standing (furniture, shelf) or wall-mounted on its bracket
Height
Preferably at mid-height or high up, facing the area to be protected
Use
Indoor and semi-outdoor areas

The Lima Shield

Hardware and sensors

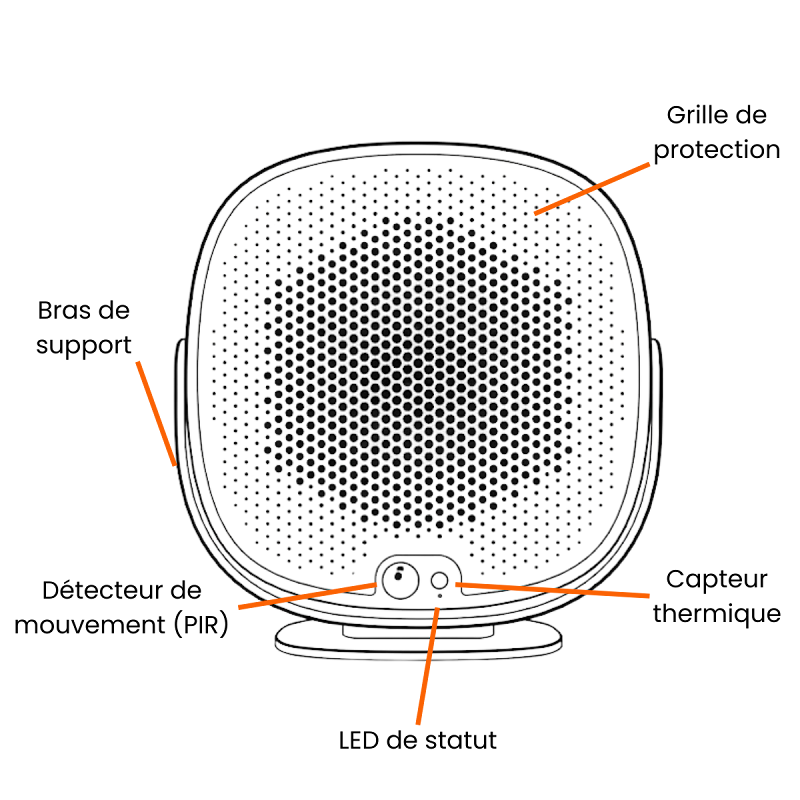
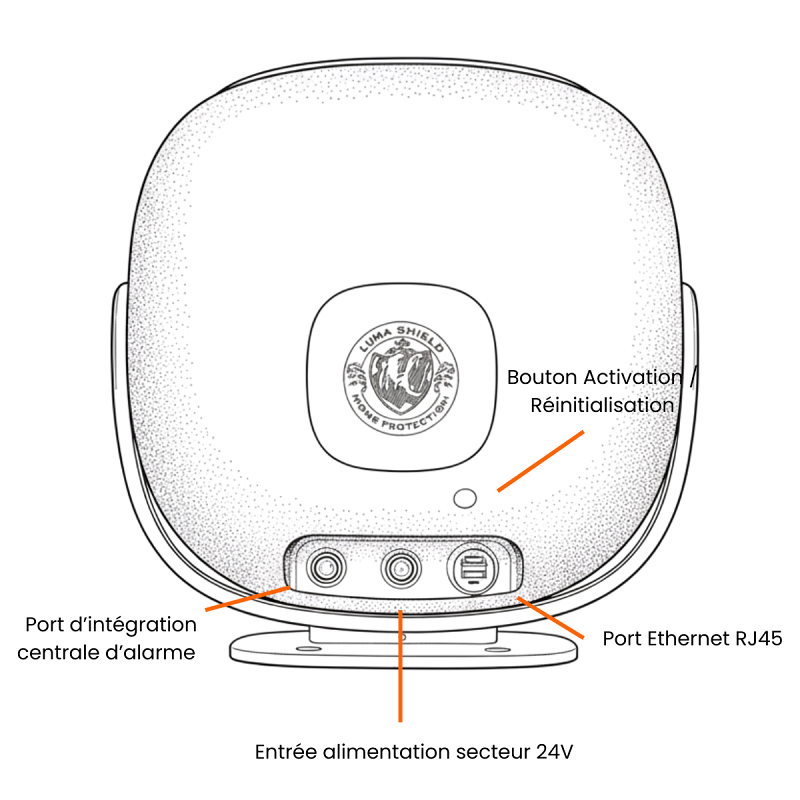
The parts of the Lima Shield, front and back, and the accessories that go with it.

Figure 3: Front of the Lima Shield with its labelled parts
figure 3
Figure 4: Back of the Lima Shield with its labelled ports
figure 4

Front

Protective grille
It protects the sound system
Motion detector
Passive infrared sensor (PIR)
Thermal sensor
Reads 192 heat points. It is not a camera: no images are captured
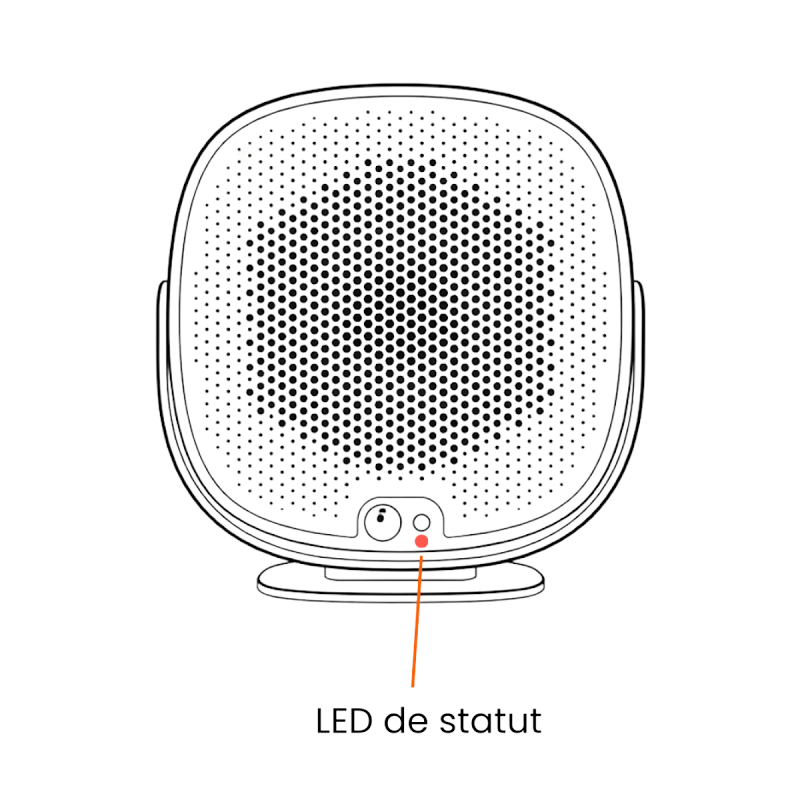
Status LED
Shows the status of the Lima Shield (see “Status LED”)
Support arm
The Lima Shield sits on its stand or mounts on the wall

Back

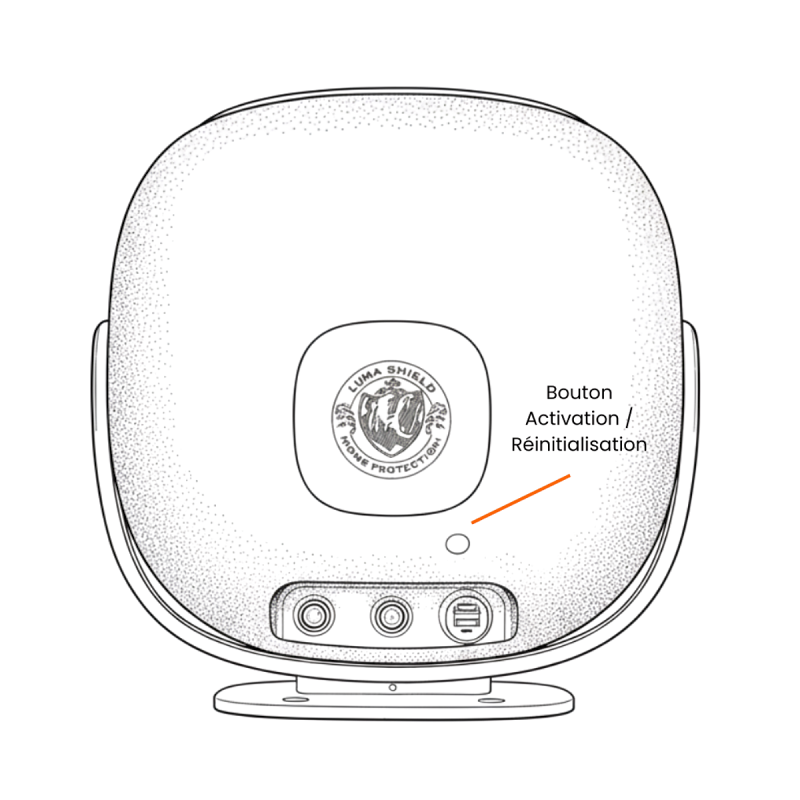
Power button
Starts the Lima Shield and is used to reset it
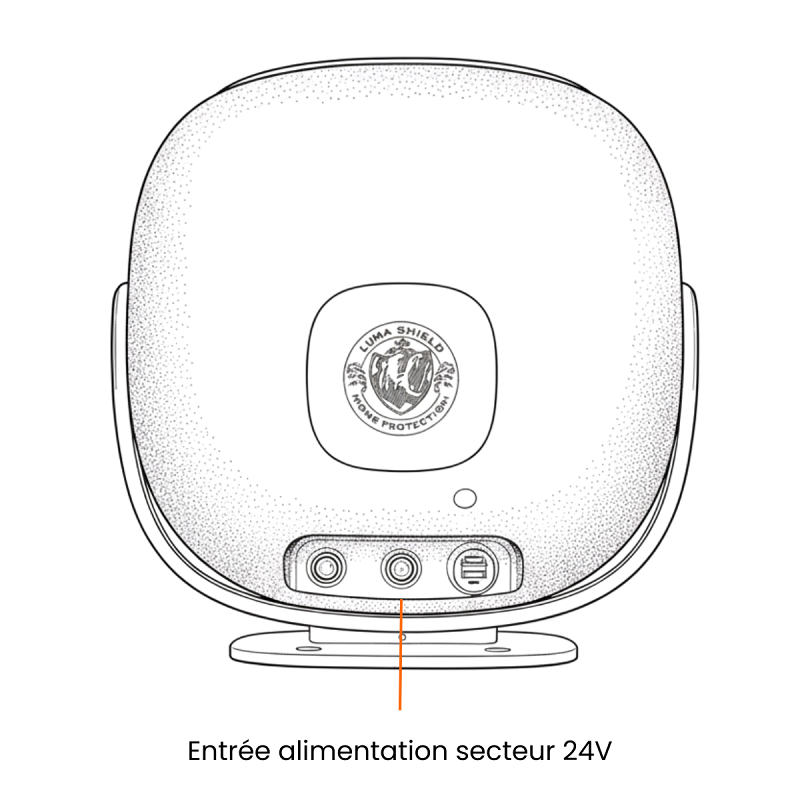
Power input
24 V mains, cable included
Ethernet port
RJ45, for a wired connection to your router
Integration port
Connection to an alarm control panel and existing detectors

Detection

Detectors
Motion, thermal and tamper
Small frames
The sensors recognise small frames and low-level movement, such as a cat's

Accessories

Control
Mobile app, remote and panic button
Access
Code keypad and badge

The Lima Shield

Connectivity and power supply

The Lima Shield connects to the Internet over Wi-Fi or Ethernet, with 4G backup, and is controlled from the Lima Shield Connect app.

Internet
Wi-Fi 2.4 GHz or Ethernet (RJ45 port)
Backup
Built-in 4G, which takes over in the event of an outage
Pairing
Bluetooth, from the app
Home automation
Zigbee
App
Lima Shield Connect, on iPhone (App Store) and Android (Google Play)
Security
Encrypted communications, audited for cybersecurity
Power supply
24 V mains, cable included
Battery
Up to 1 month on the internal battery, and up to 3 months with the optional secondary batteries
Without power or Internet
The Lima Shield carries on protecting

The Lima Shield

Warranty and compliance

The Lima Shield comes with a 2-year warranty and complies with European CE standards.

Warranty
2 years, excluding the battery
Compliance
European CE standards
Lifespan
Designed to last 10 years
Identification
A serial number for each unit, on the label at the bottom of the Lima Shield, above the connectors
Support
By phone on +33 6 73 28 14 96, or by email at support@limashield.com

Install

How do I install the Lima Shield?

The Lima Shield needs no installer: plug in one cable, then set everything up in the Lima Shield Connect app in 5 to 10 minutes. For screen-by-screen guidance, follow the step-by-step installation.

What you need

The Lima Shield
With its power cable, supplied
A power socket
Nearby
Your smartphone
With Bluetooth turned on
Your 2.4 GHz Wi-Fi
And its password, or an Ethernet cable connected to your router

The steps

  1. Place the Lima Shield on a flat surface, near a socket. Plug the supplied cable into the back of the Lima Shield, then into the wall socket.

    Figure 7: The mains power port on the back of the Lima Shield
    figure 7
  2. Press and hold the button on the back of the Lima Shield for at least 3 seconds. Its LED lights up white.

    Figure 27: The power button on the back of the Lima Shield
    figure 27
  3. Install the Lima Shield Connect app and create your account (see how to download the app).

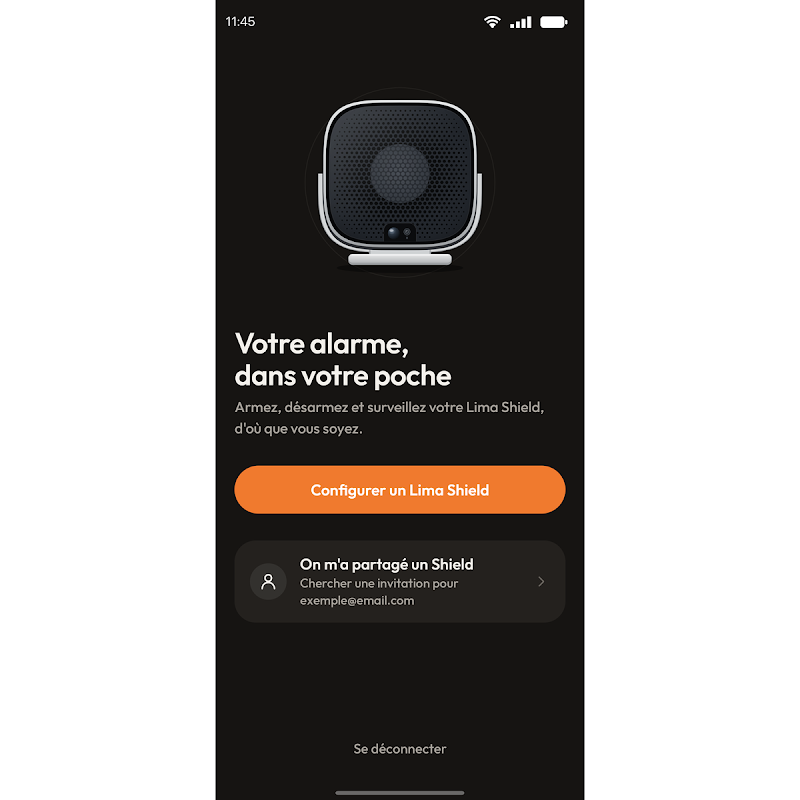
  4. In the app, tap “Set up a Lima Shield”. Turn on your phone's Bluetooth if the app asks. No need to do anything on the Lima Shield itself: just stay within 5 metres, in the same room.

    Figure 11: The app's home screen with the “Set up a Lima Shield” button
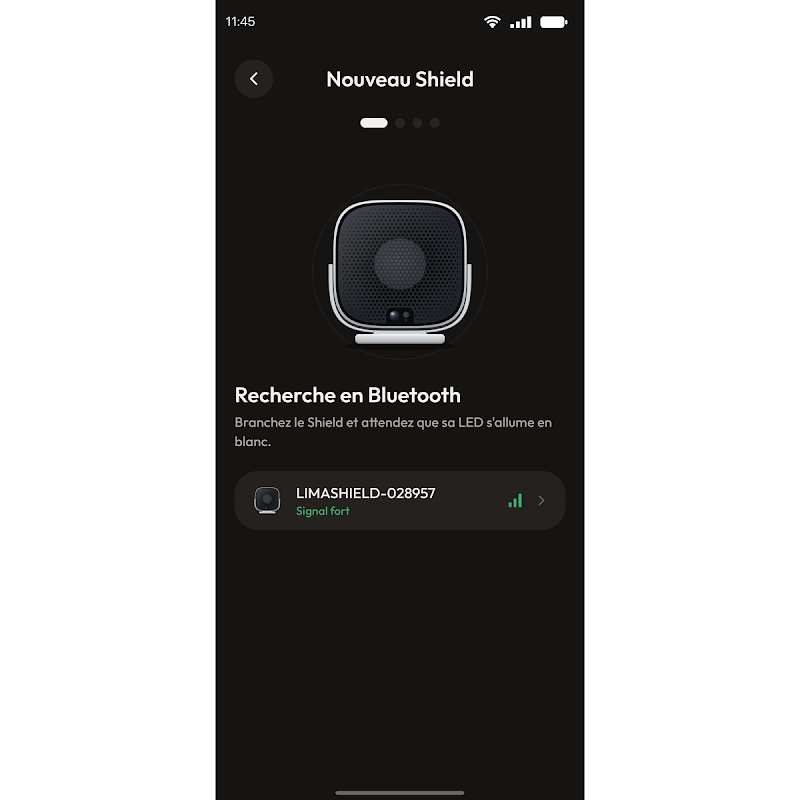
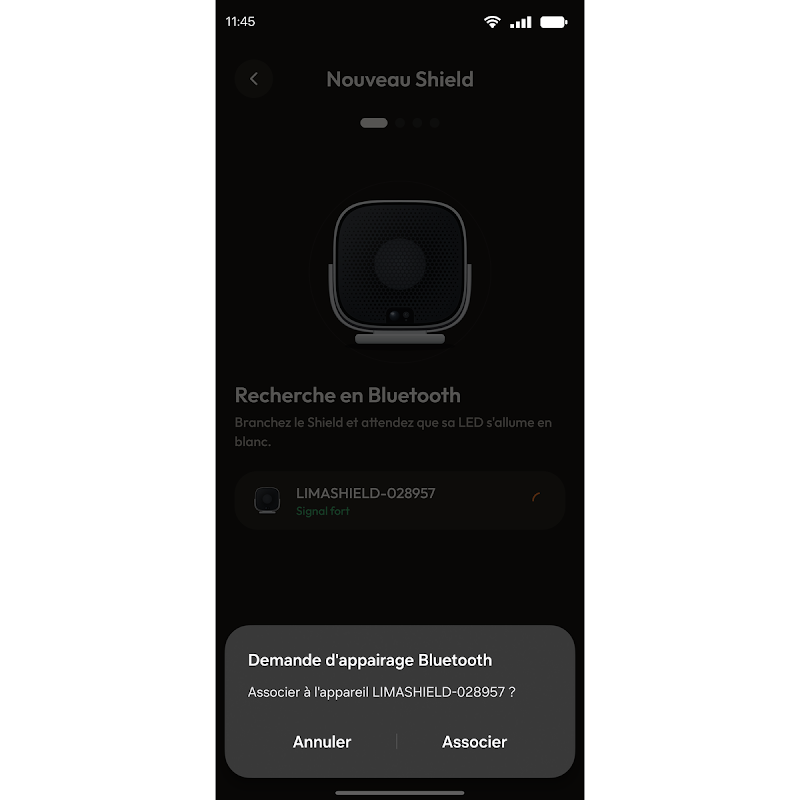
  5. Tap your Lima Shield in the list (its name starts with LIMASHIELD), then tap “Pair”.

    Figure 13: List of Lima Shield units detected over Bluetooth
    Figure 14: The phone's Bluetooth pairing request
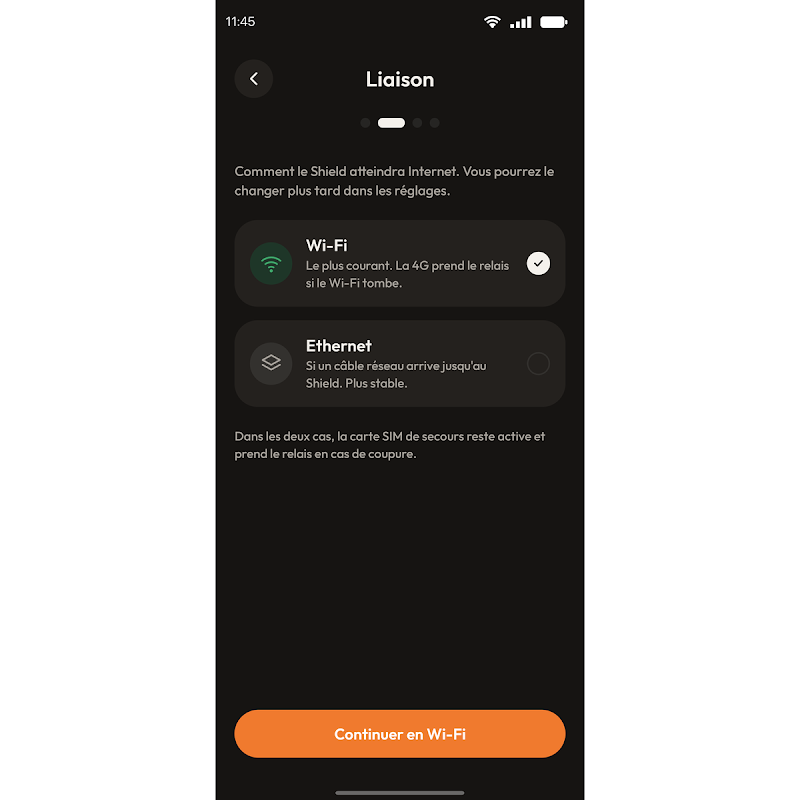
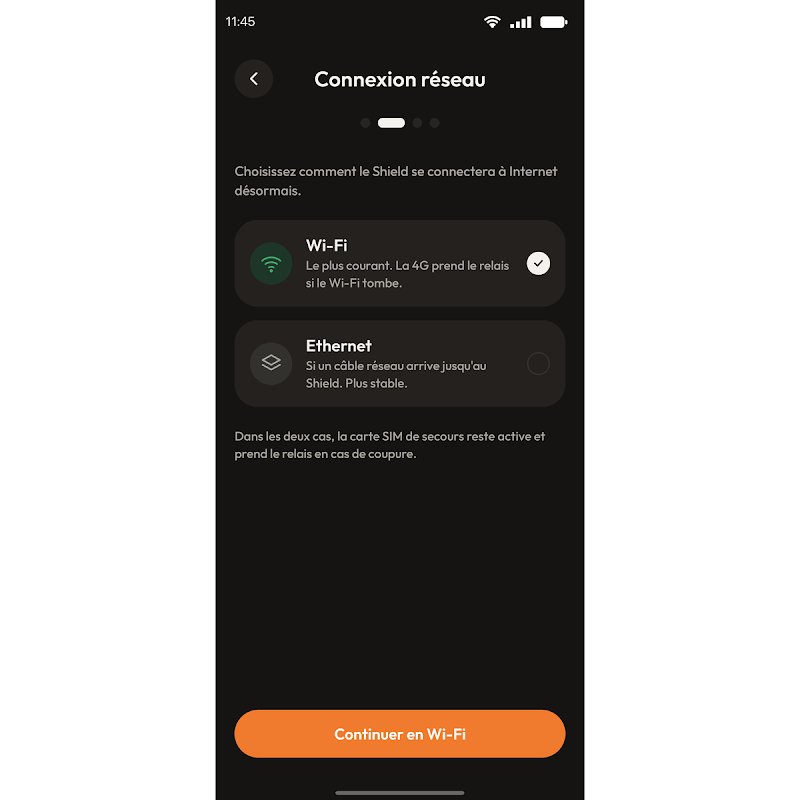
  6. Choose how it connects to the Internet: “Wi-Fi” (recommended) or “Ethernet”, using a network cable between the back of the Lima Shield and your router. Either way, 4G takes over if there is an outage.

    Figure 15: Choosing the connection: Wi-Fi or Ethernet
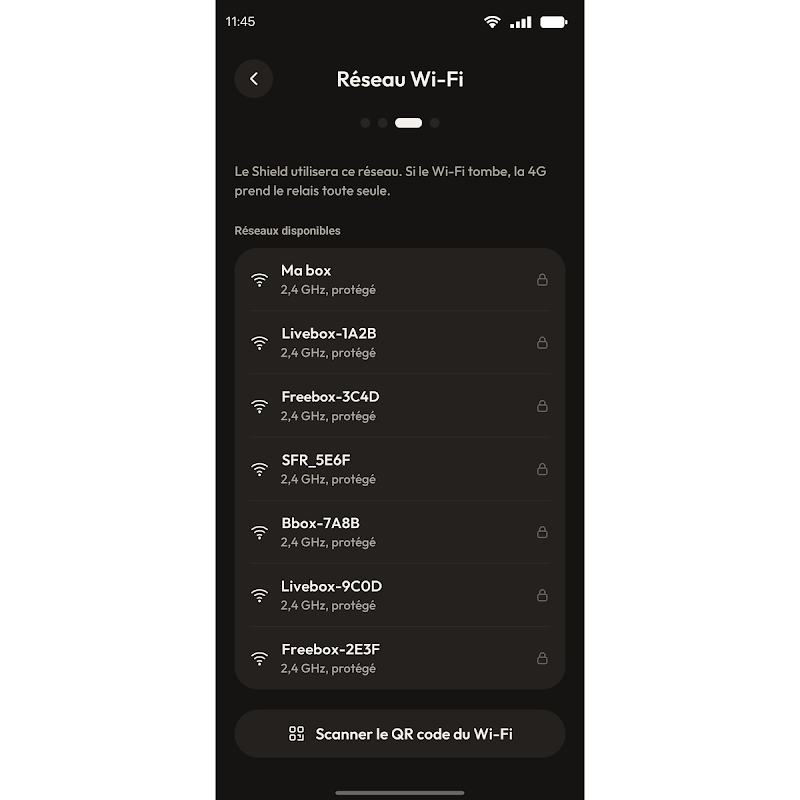
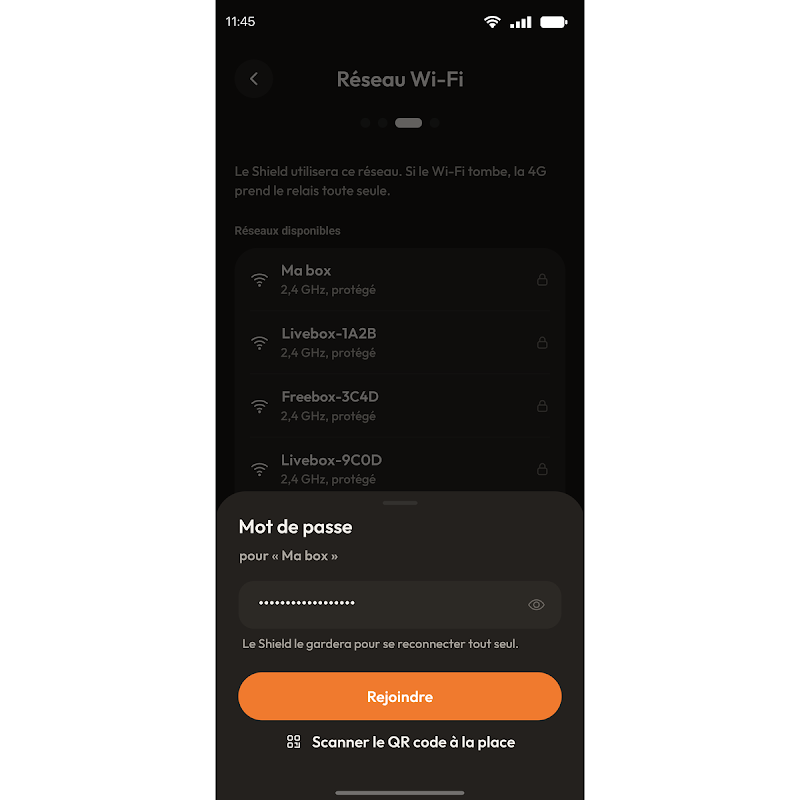
  7. For Wi-Fi, choose your network, enter its password and tap “Join”. You can also scan your router's QR code.

    Figure 16: Choosing the Wi-Fi network
    Figure 17: Entering the network password
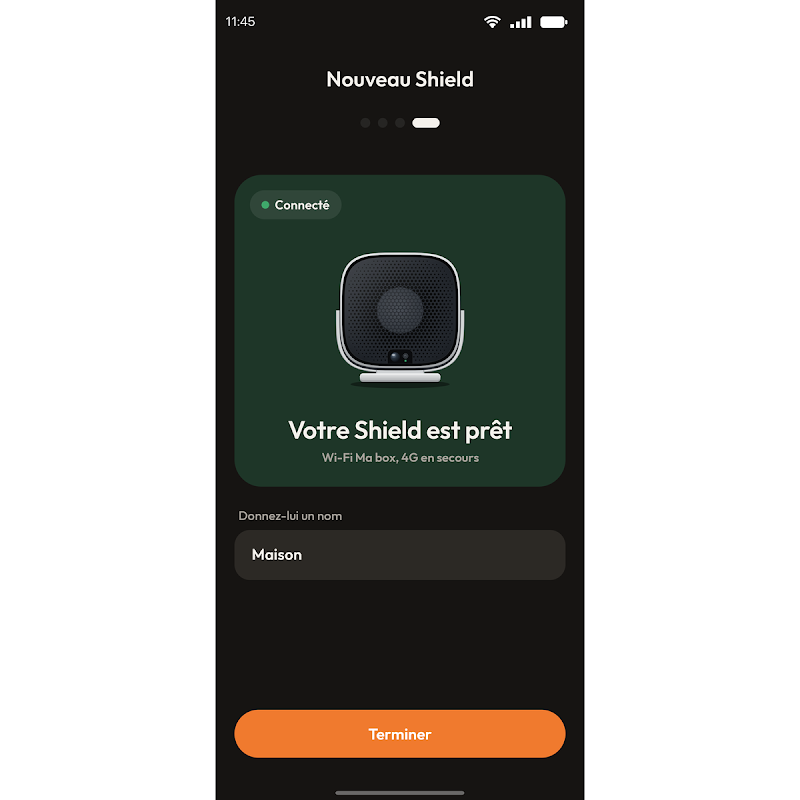
  8. When “Your Shield is ready” appears, give it a name if you wish, for example Home, then tap “Finish”. If an update is offered, tap “View update” to install it, or “Later”.

    Figure 18: The “Your Shield is ready” screen

You are all set: the Lima Shield is connected and disarmed, and its status LED is solid white. To activate it, see how to arm the Lima Shield.

Install

Where should I place the Lima Shield?

The Lima Shield can stand on a piece of furniture or a shelf, or be wall-mounted on its bracket. Ideally, place it at mid-height or high up, facing the area to be protected, near a socket.

Location
Indoors, or in a semi-outdoor area: it resists dust and moisture (IP54)
Height
Preferably at mid-height or high up
Orientation
Towards the area to be protected
Area
70 to 100 m² per unit, depending on the configuration and the acoustics of the space. Beyond that, add another Lima Shield
Power supply
Near a power socket, for the supplied cable

Using the app

How do I download the Lima Shield Connect app?

The Lima Shield Connect app is available on the App Store for iPhone and on Google Play for Android. All Lima Shield setup is done in the app.

  1. On iPhone, open the App Store; on Android, open Google Play. Search for “Lima Shield Connect”, or use the buttons above.

  2. Install the app, then open it.

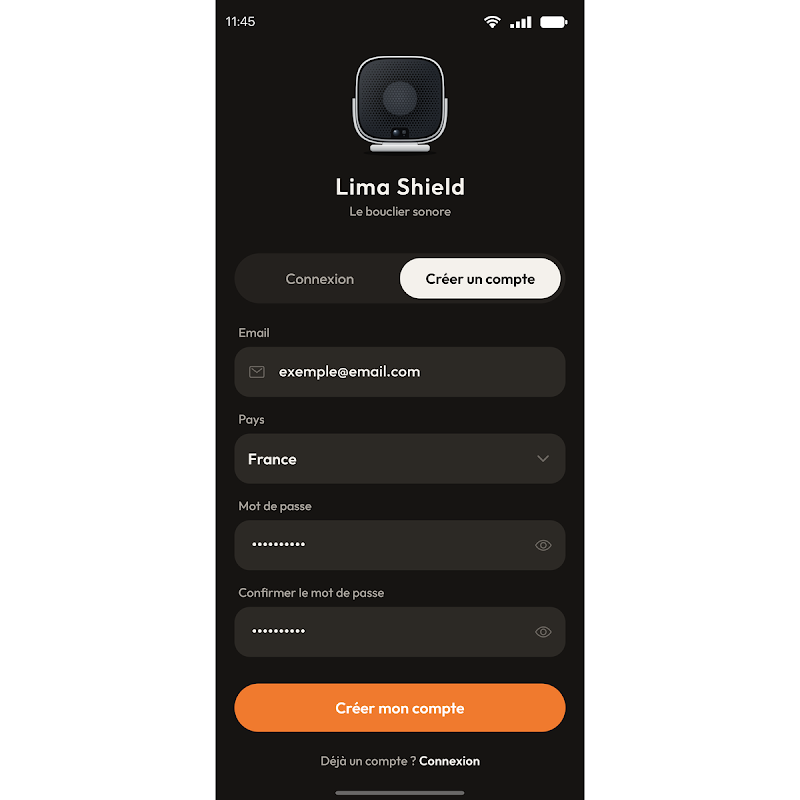
  3. Tap “Create an account”. Enter your email, your country and a password, then tap “Create my account”.

    Figure 10: The account creation screen in the app
  4. Allow notifications when your phone asks: that is how you are alerted in the event of an alarm.

To add your Lima Shield to the app afterwards, see how to install the Lima Shield.

Using the app

What does the “Home” screen show?

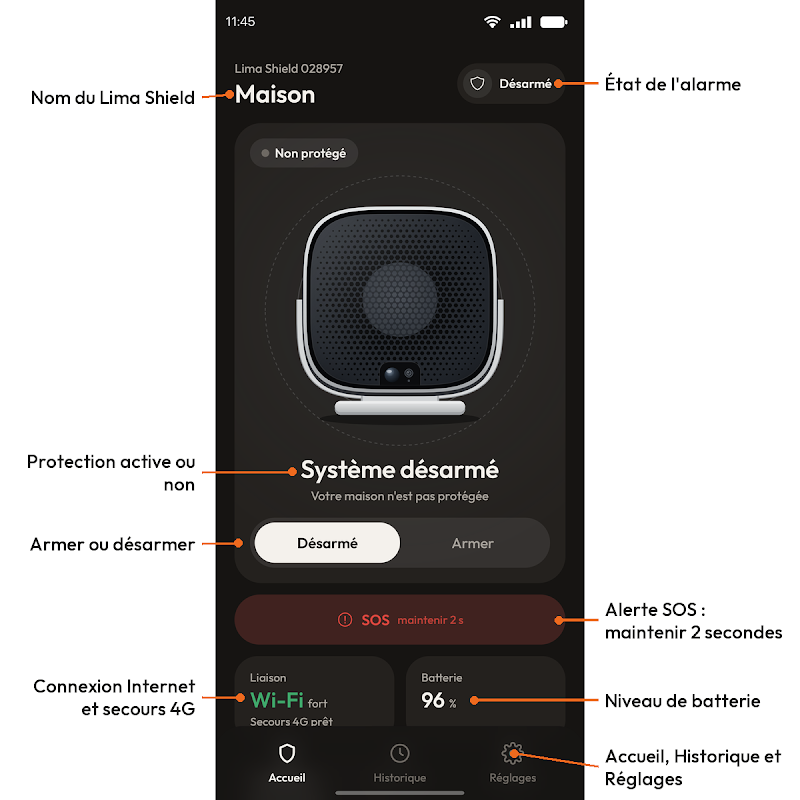
The “Home” screen of the Lima Shield Connect app shows the status of your sound shield and lets you arm it, disarm it or trigger the SOS alert.

Figure 19: The app's “Home” screen with its labelled elements
figure 19
Lima Shield name
Its number and the name you gave it.
Alarm status
“Disarmed”, “Armed”, “Detection” or “Alarm”.
Arm or disarm
Tap “Arm” to start monitoring, “Disarm” to stop it.
SOS alert
Hold the SOS button for 2 seconds to trigger the siren immediately.
Internet connection
Wi-Fi or Ethernet, and the status of the 4G backup.
Battery level
The remaining battery charge.
Tabs
“Home”, “History” and “Settings”, at the bottom of the screen.

Using the app

How do I arm and disarm the Lima Shield?

The Lima Shield goes through four states. The app screen and the status LED always show the current one.

Without a phone, you can also arm and disarm with the code keypad (see how to arm and disarm with the code keypad).

  1. Disarmed

    Monitoring is off. Tap “Arm” to turn it on. The status LED is solid white.

  2. Armed

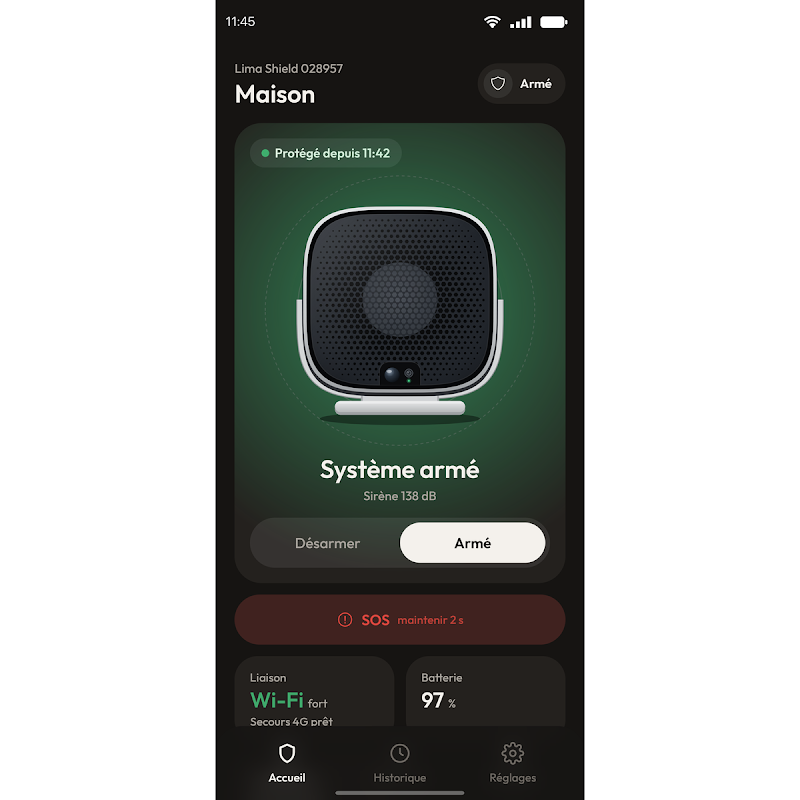
    The screen turns green and shows “System armed”. The Lima Shield activates its detectors (motion, thermal, tamper) and monitors the protected site. The LED turns solid red.

    Figure 20: The “System armed” screen, on a green background
    Figure 21: The red status LED on the armed Lima Shield
    figure 21
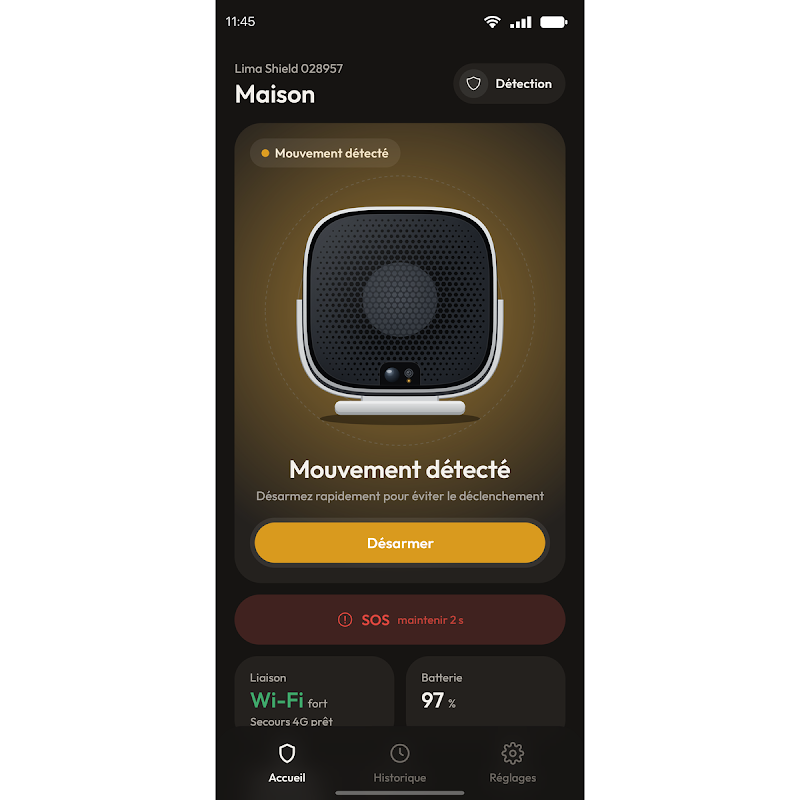
  3. Motion detected

    The screen turns orange. You have 10 seconds to tap “Disarm”.

    Figure 22: The “Motion detected” screen, on an orange background
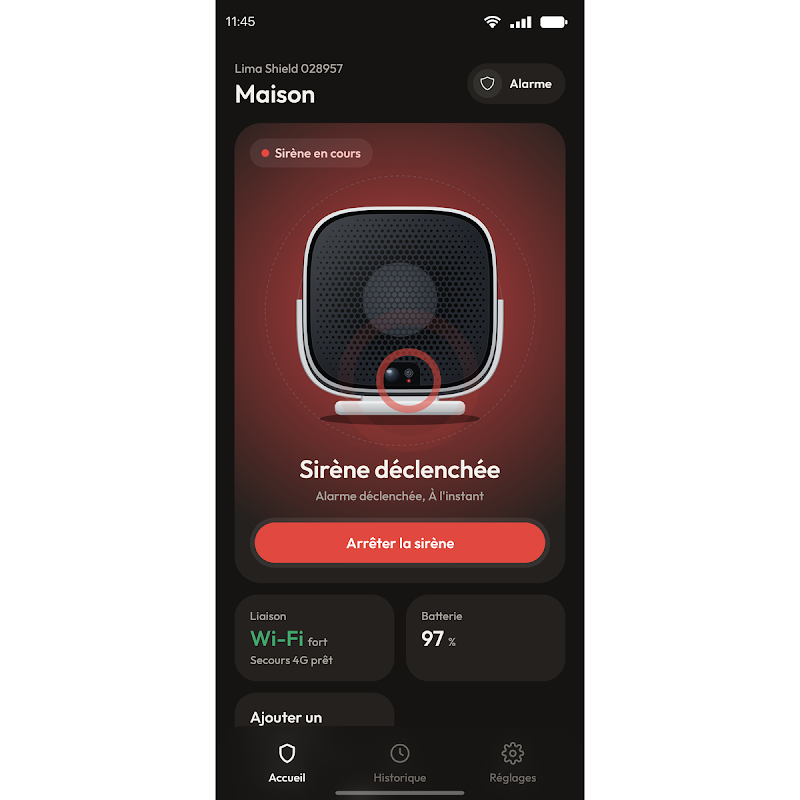
  4. Alarm

    Once that time is up, the siren goes off, the screen turns red and the LED flashes red. Tap “Stop siren” to silence it: the Lima Shield then stays armed.

    Figure 23: The alarm screen, on a red background

Using the app

How do I stop the siren?

To stop the Lima Shield's siren, tap “Stop siren” in the app: the Lima Shield then stays armed. You can also disarm it with the code keypad, a badge or the remote control, if they are installed.

Figure 23: The alarm screen, on a red background

If you do nothing, the siren sounds in sequence, alternating with pauses, for the duration set in “Settings”, then “Alarm” (see set and test the siren).

To stop monitoring, tap “Disarm” on the “Home” screen.

Using the app

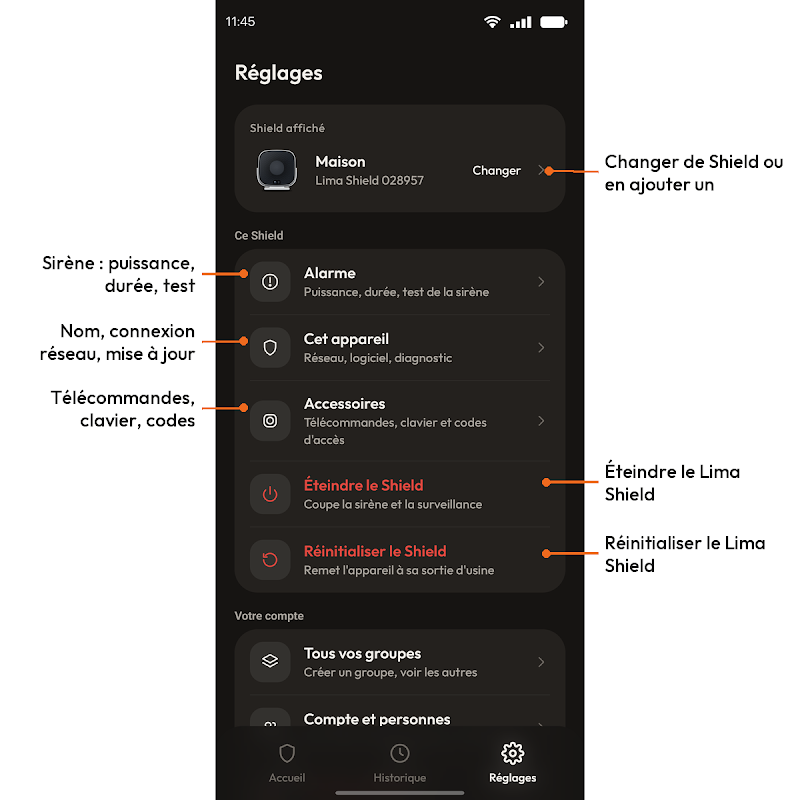
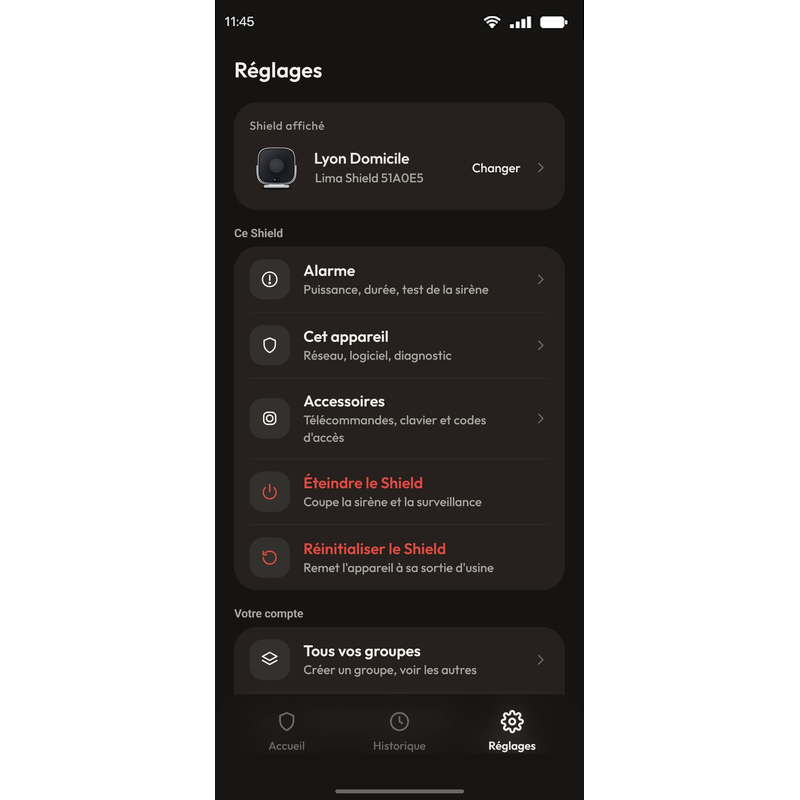
How do I adjust the Lima Shield settings?

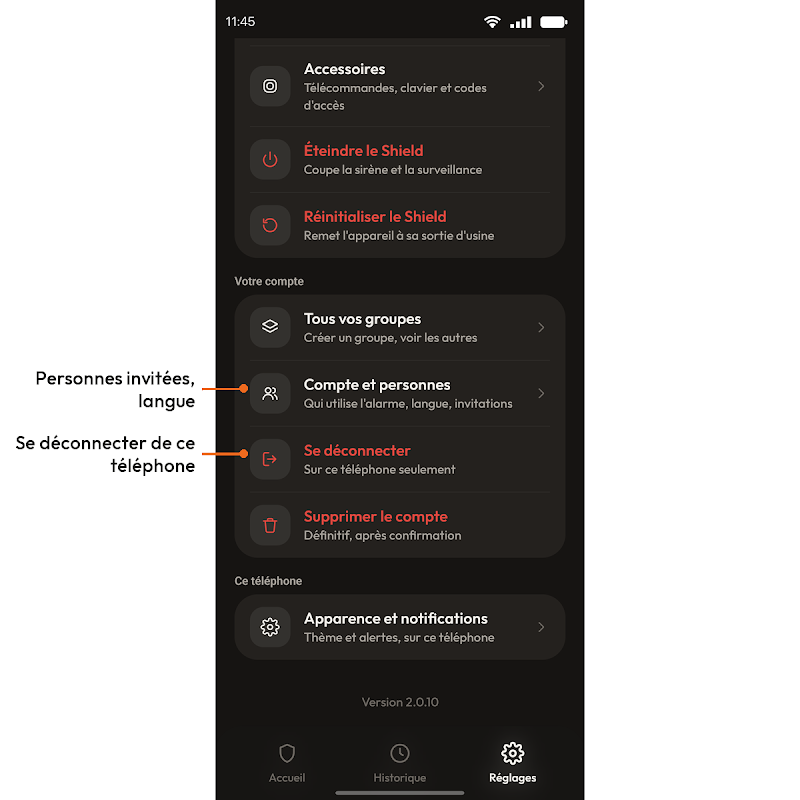
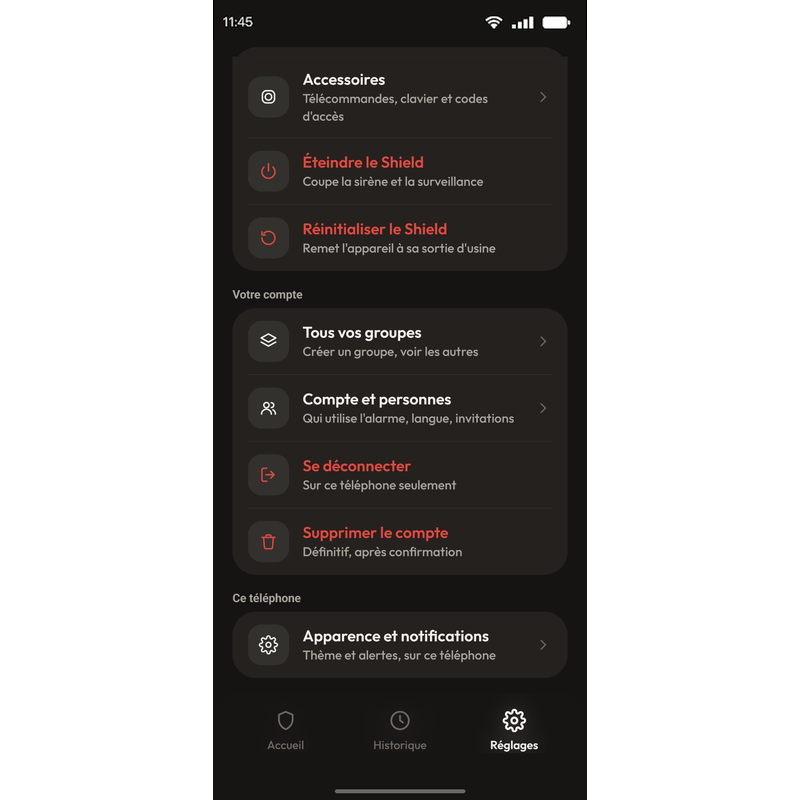
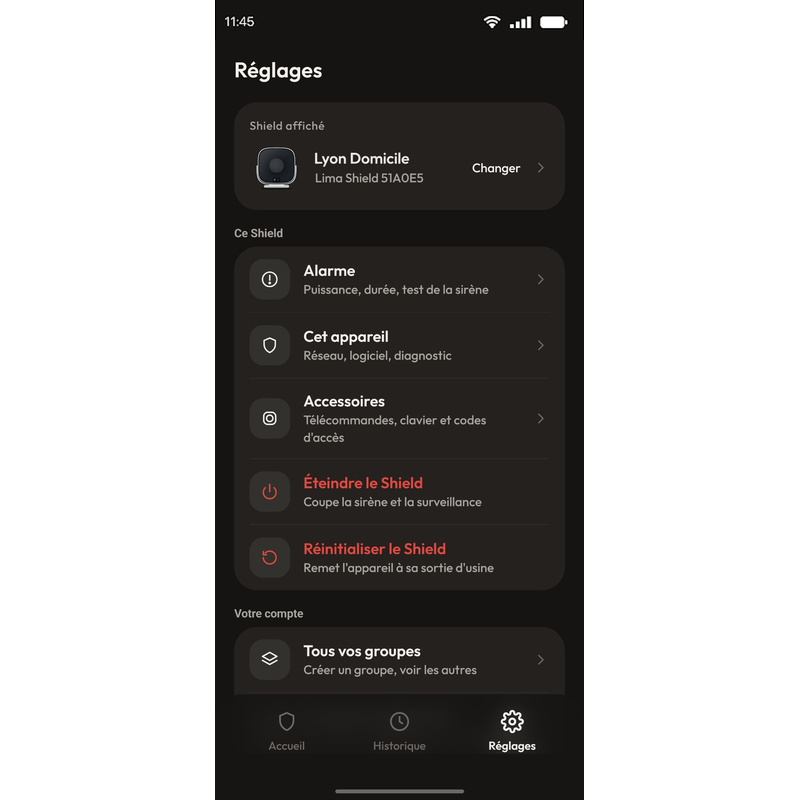
It brings together the settings for the Lima Shield and for your account. The Lima Shield settings are only available to the administrator account, the one used to install the Lima Shield.

Figure 25: The “Settings” tab, first part
figure 25
Figure 26: The “Settings” tab, second part
figure 26
Change
Shows another Lima Shield, or adds one with “Add a Shield”.
Alarm
Siren power and duration, siren test (see set and test the siren).
This device
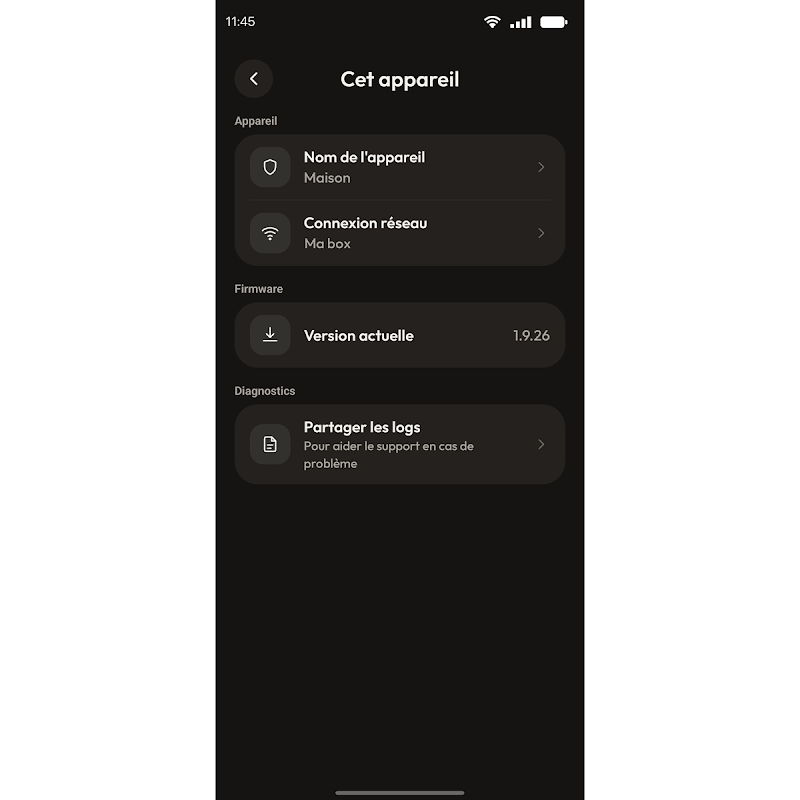
Lima Shield name, network connection and updates.
Accessories
Remote controls, keypad and access codes (see add an accessory).
Turn off the Shield
Silences the siren and stops monitoring (see turn off or reset).
Reset the Shield
Restores the Lima Shield to its factory settings (see turn off or reset).
Account and people
Your account, the language and the people who have access to the alarm.
Log out
Logs your account out of this phone only.

Manage

How do I invite someone?

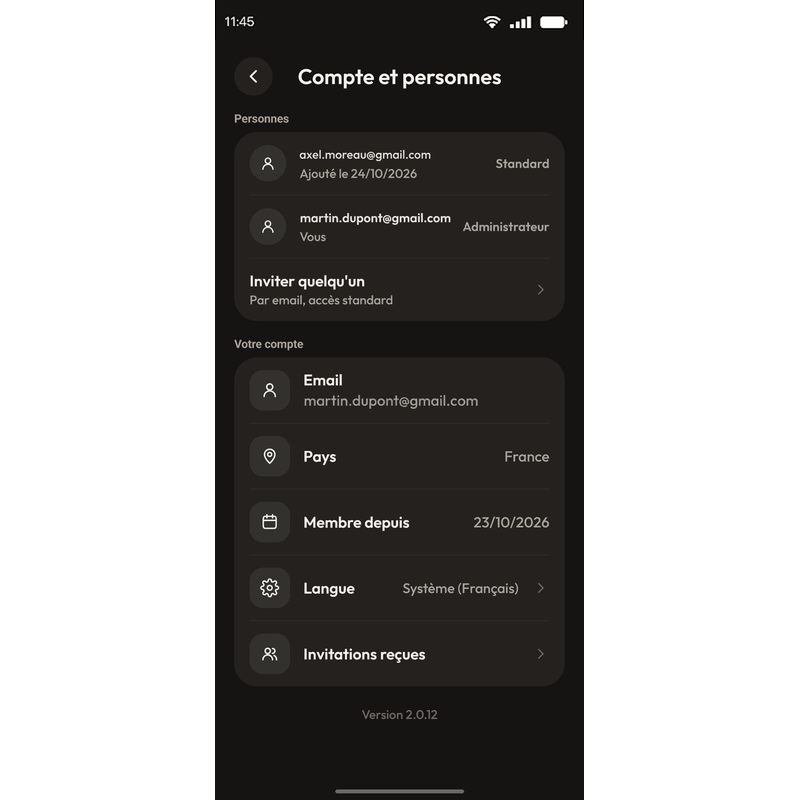
You can give other people access to your Lima Shield. They will be able to arm it, disarm it and view the history, but not change its settings.

  1. In “Settings”, tap “Account and people”, then “Invite someone”.

    Figure 56: The “Settings” tab, “Account and people” section
    Figure 34: The “Account and people” screen
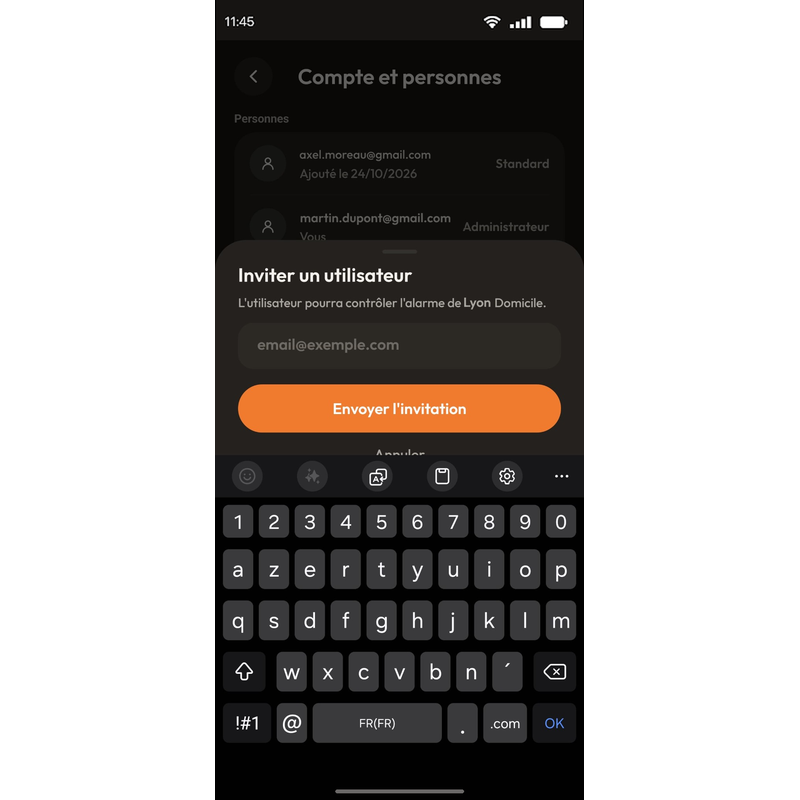
  2. Enter the person's email and tap “Send invitation”.

    Figure 35: The “Invite a user” window
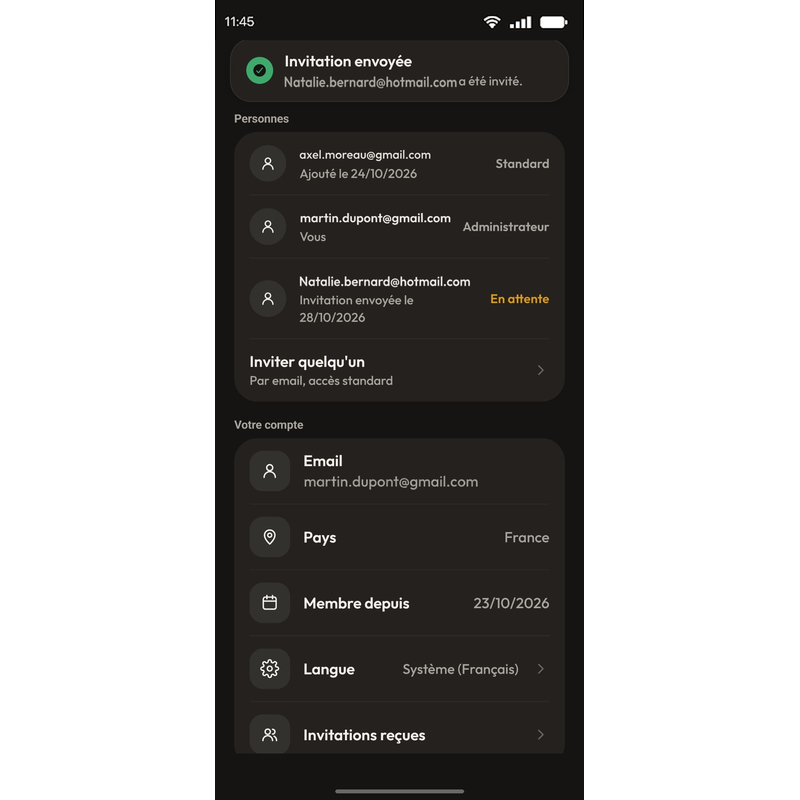
  3. The person appears as “Pending”. They create their account in the app with that email, then tap “Accept invitation”.

    Figure 36: Invitation sent, the person appears as “Pending”

Cancel an invitation

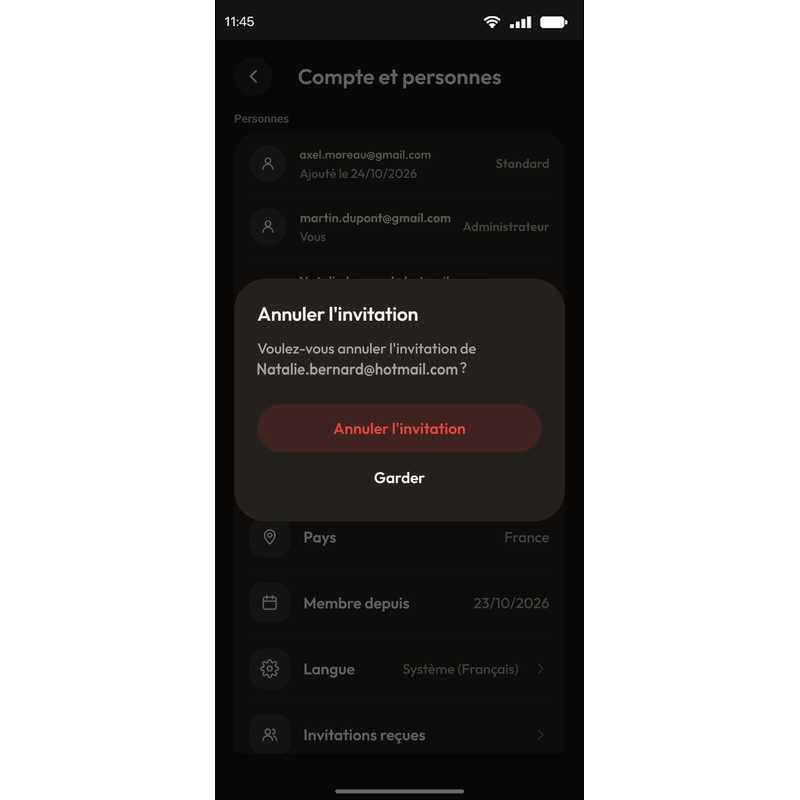
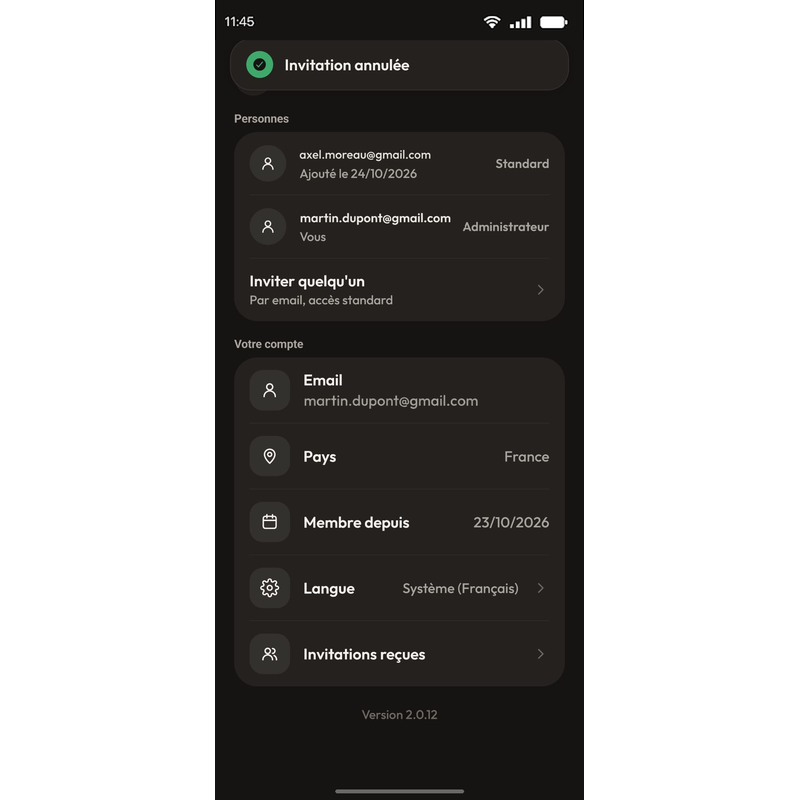
Wrong address? Open the pending invitation in “Account and people”, then tap “Cancel invitation”.

Figure 37: The “Cancel invitation” window
Figure 38: Invitation cancelled

To be guided screen by screen, follow the step-by-step guide to adding a contact.

Manage

How do I set and test the siren?

In “Settings”, tap “Alarm”: this is where you set the siren's power and duration, and where you can test it. The Lima Shield's power is adjustable from 86 to 138 dB.

The sound test can be very loud. Warn anyone nearby and move away from the Lima Shield before starting a test. Do not run a test close to anyone's ears.
Manage

How do I add a remote control or a code keypad?

The Lima Shield can also be controlled without a phone: with a code keypad or a badge, a remote control or a panic button.

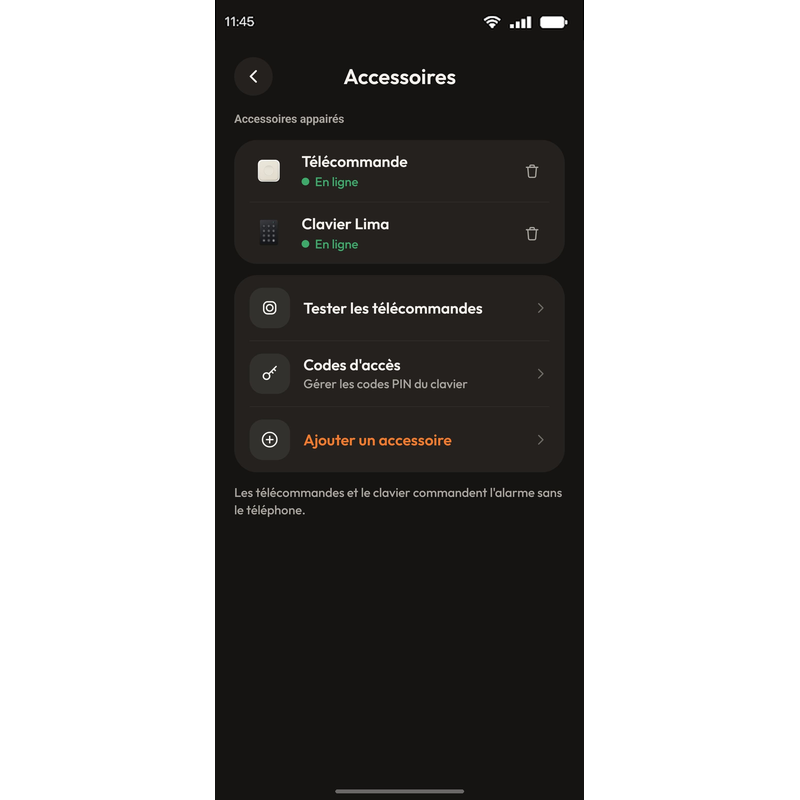
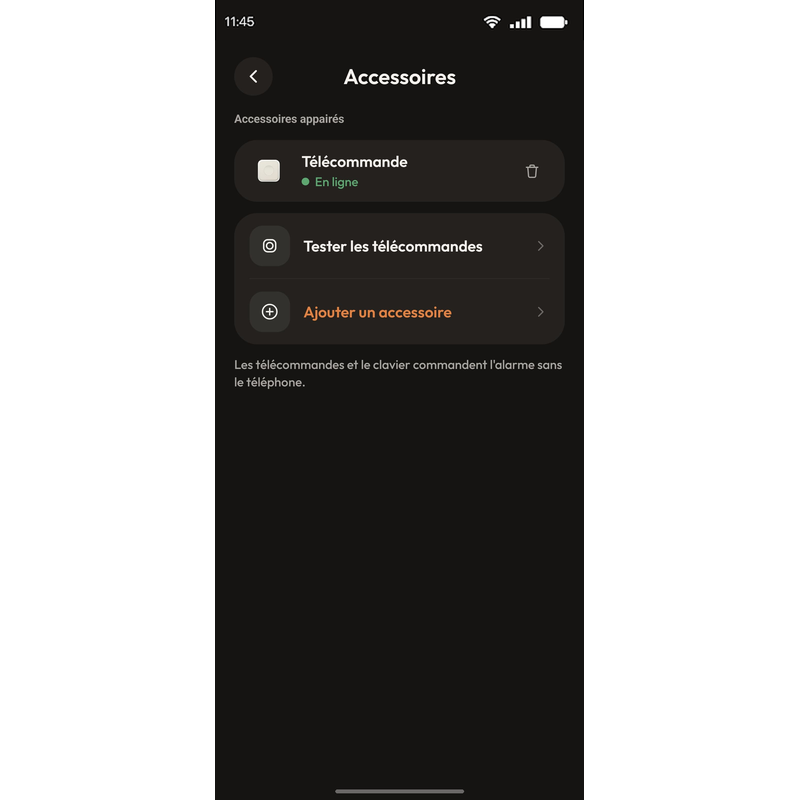
To add them, open “Settings”, then “Accessories”: this is where you manage remote controls, the keypad and access codes.

Add the remote control

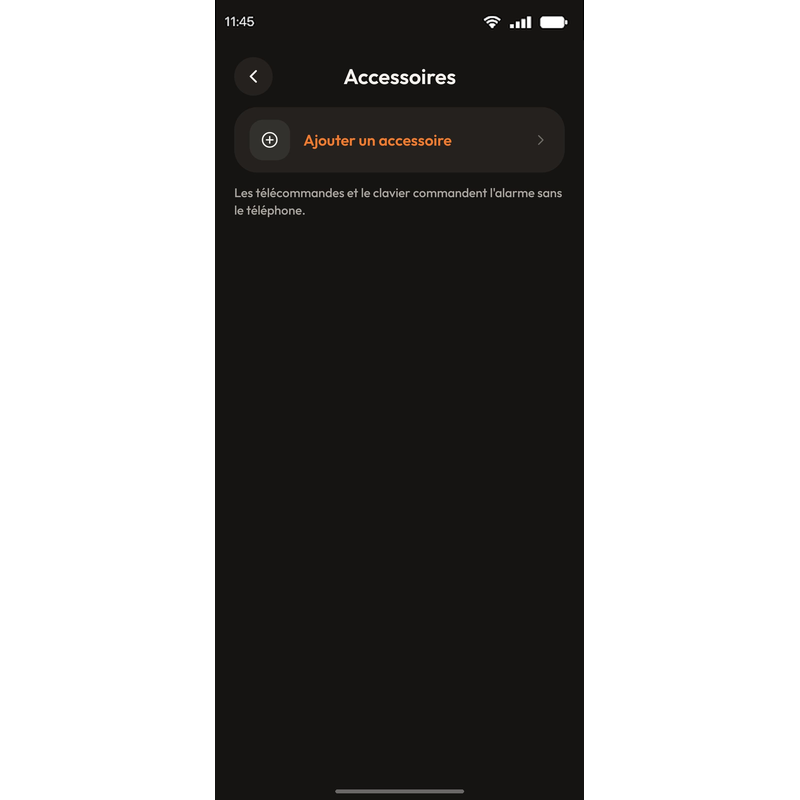
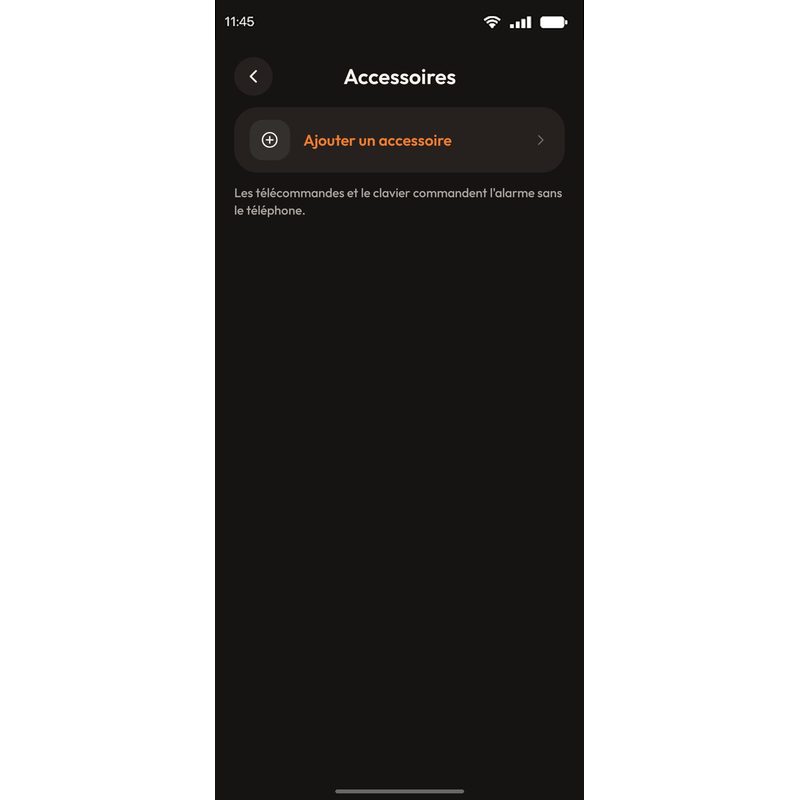
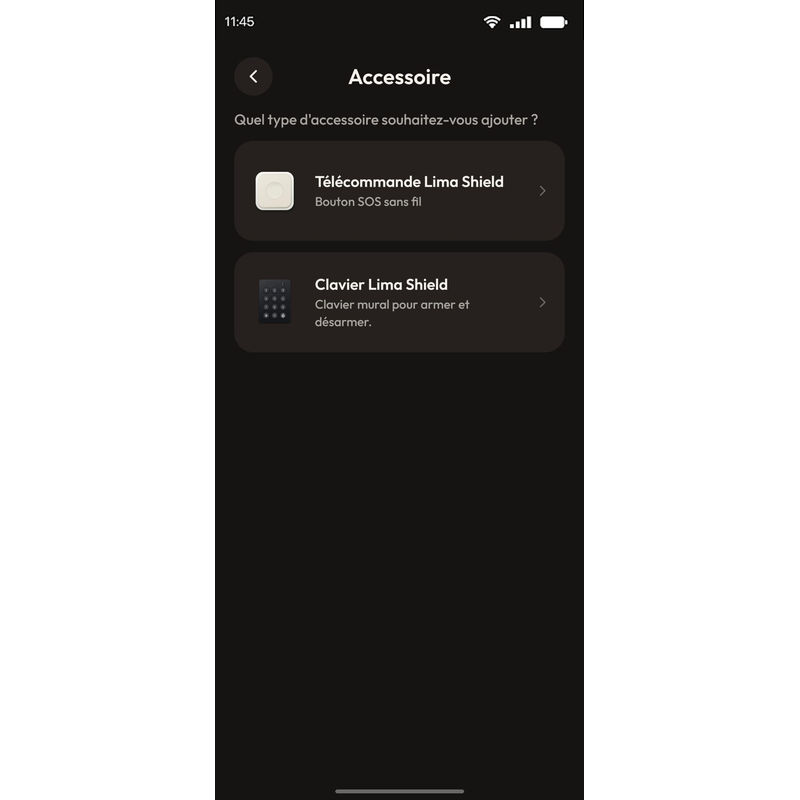
  1. In “Settings”, tap “Accessories”, then “Add an accessory”.

    Figure 39: The “Settings” tab, “Accessories” section
    Figure 40: The “Accessories” screen with “Add an accessory”
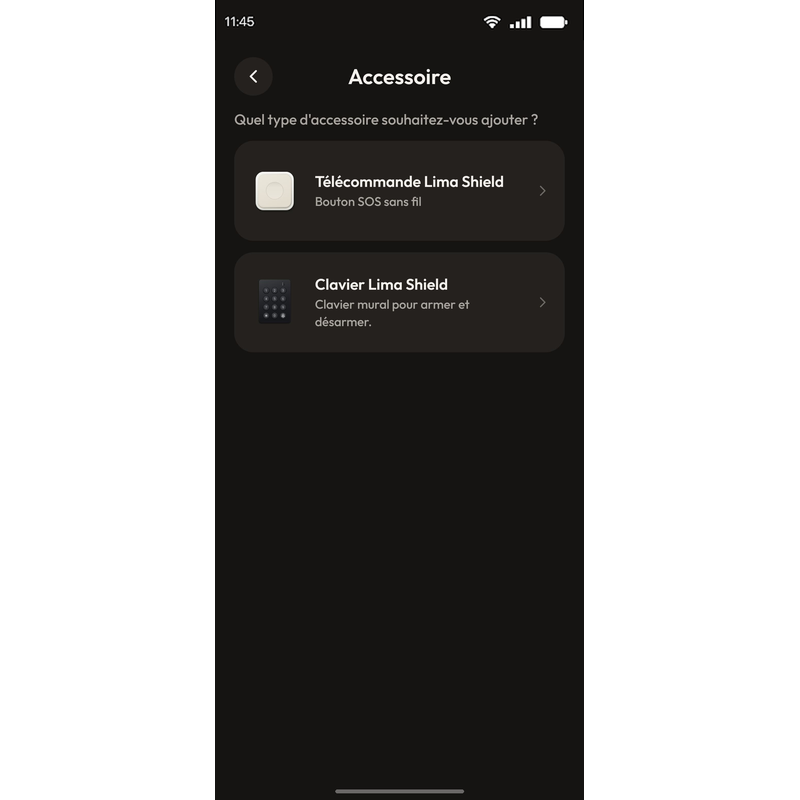
  2. Tap “Lima Shield Remote”, the wireless SOS button.

    Figure 41: Choosing the accessory type
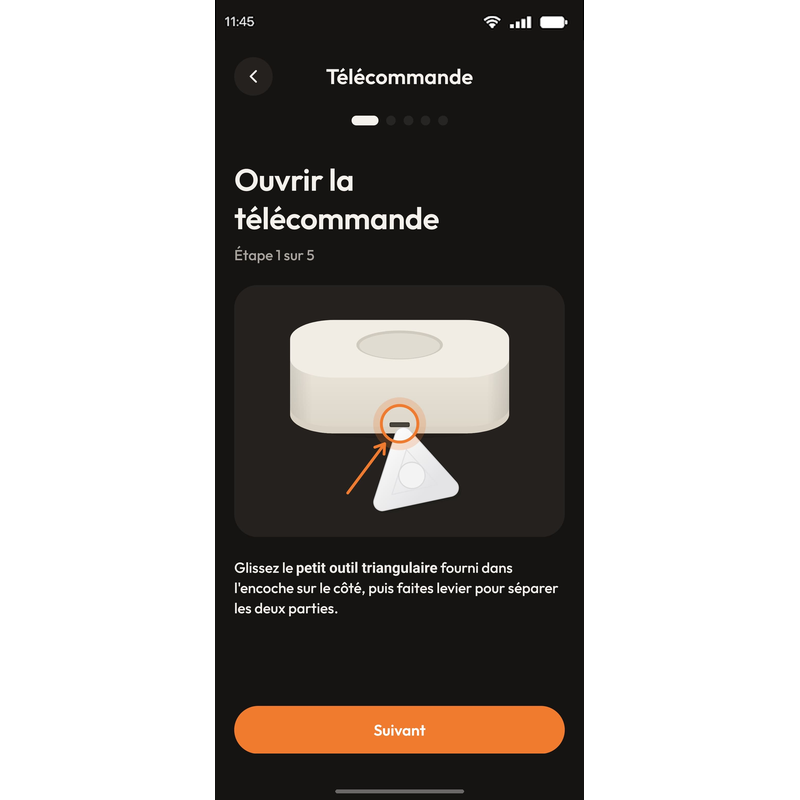
  3. Open the remote control: slide the small triangular tool provided into the notch on the side, then lever the two halves apart.

    Figure 42: Opening the remote control, step 1 of 5
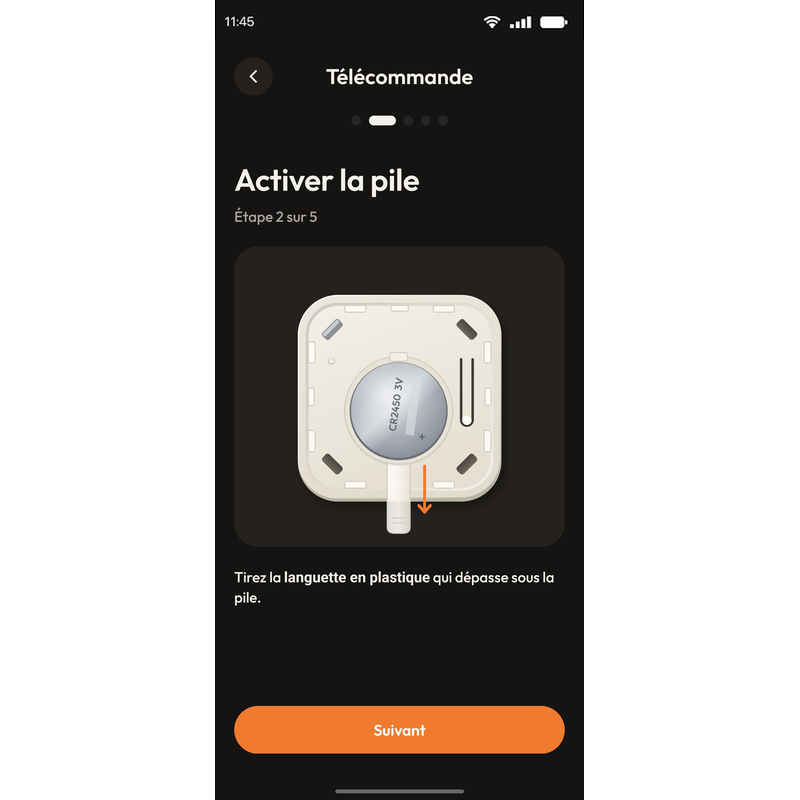
  4. Activate the battery: pull out the plastic tab sticking out from under the battery.

    Figure 43: Activating the battery, step 2 of 5
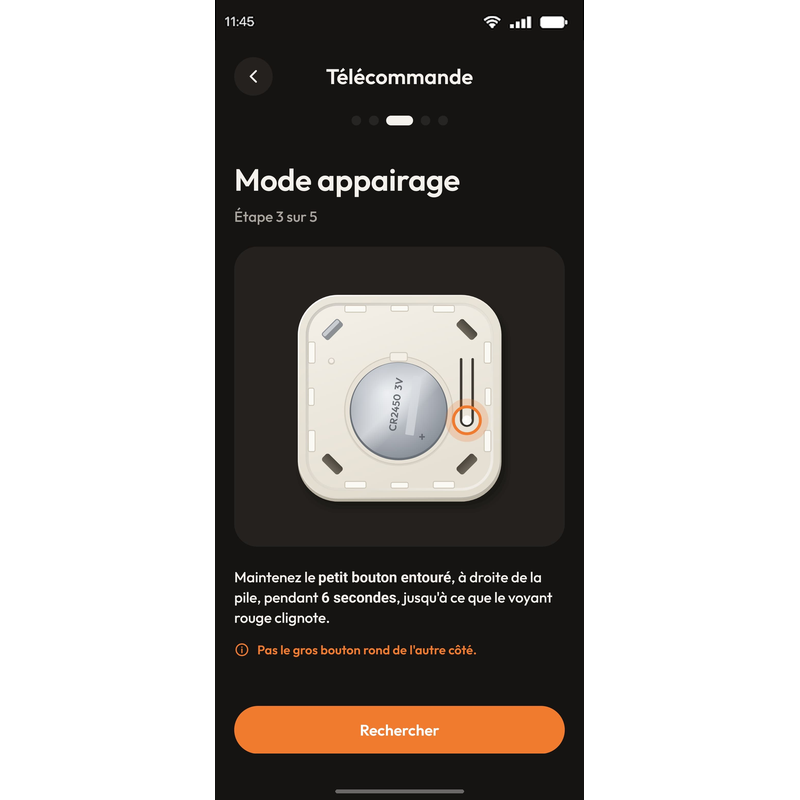
  5. Hold down the small circled button, to the right of the battery, for 6 seconds, until the red light flashes. Not the large round button on the other side. Then tap “Search”.

    Figure 44: Remote control pairing mode, step 3 of 5
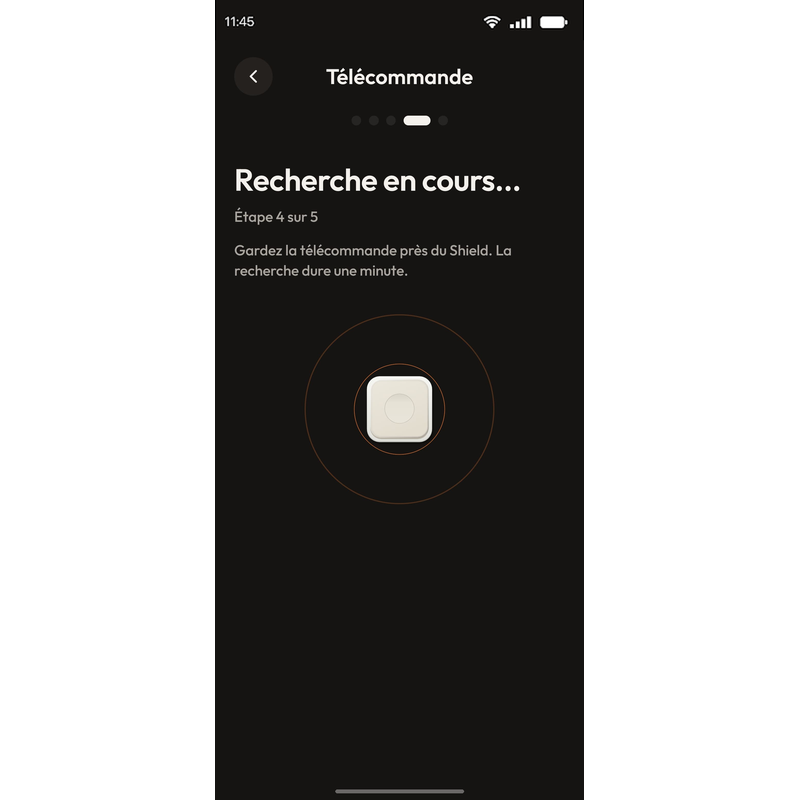
  6. Keep the remote control close to the Lima Shield: the search takes one minute.

    Figure 45: Searching for the remote control, step 4 of 5
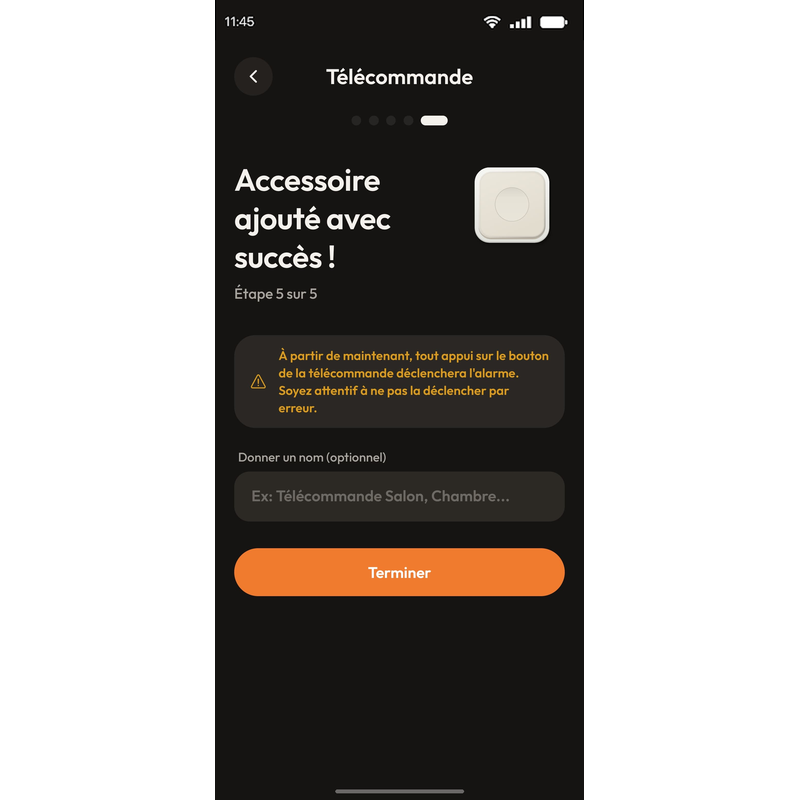
  7. Give it a name if you wish, then tap “Finish”. It appears in your accessories.

    Figure 46: Remote control added, step 5 of 5
    Figure 47: The remote control in the accessories

As soon as the remote control has been added, pressing its button triggers the alarm. Take care not to set it off by mistake.

Add the keypad

  1. In “Settings”, tap “Accessories”, then “Add an accessory”.

    Figure 48: The “Settings” tab, “Accessories” section
    Figure 49: The “Accessories” screen with “Add an accessory”
  2. Tap “Lima Shield Keypad”.

    Figure 50: Choosing the accessory type
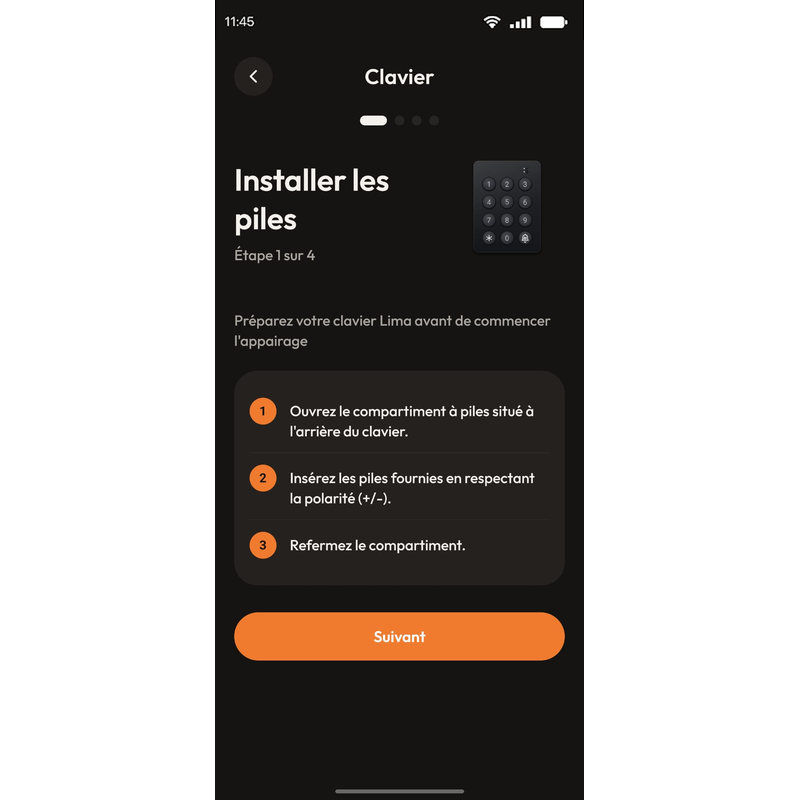
  3. Install the batteries: open the compartment on the back of the keypad, insert the supplied batteries with the correct polarity (+/−), then close it.

    Figure 51: Installing the keypad batteries, step 1 of 4
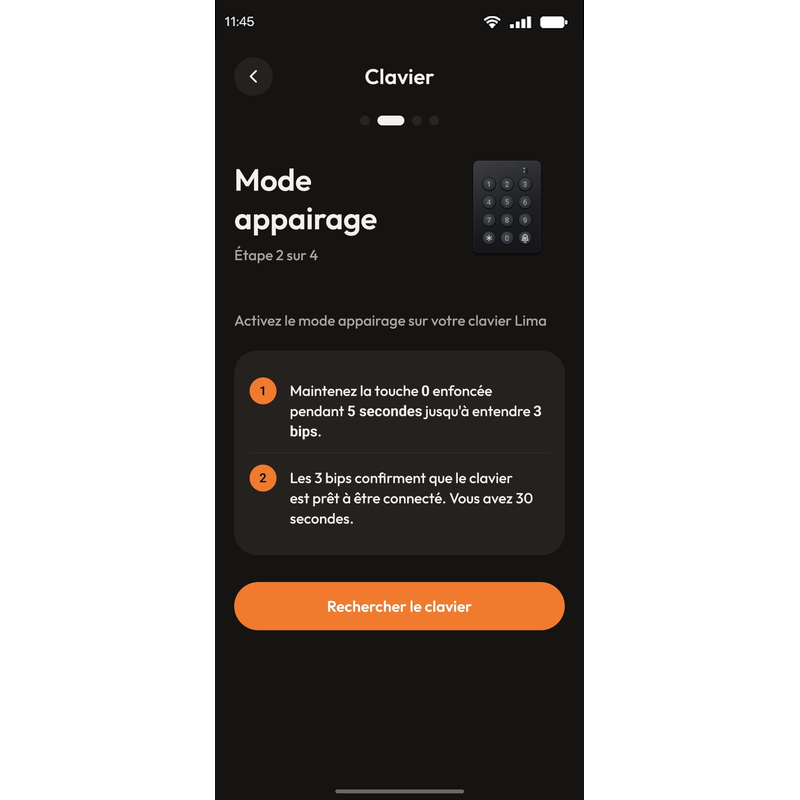
  4. Hold down the 0 key for 5 seconds, until you hear 3 beeps. You then have 30 seconds to tap “Search for keypad”.

    Figure 52: Keypad pairing mode, step 2 of 4
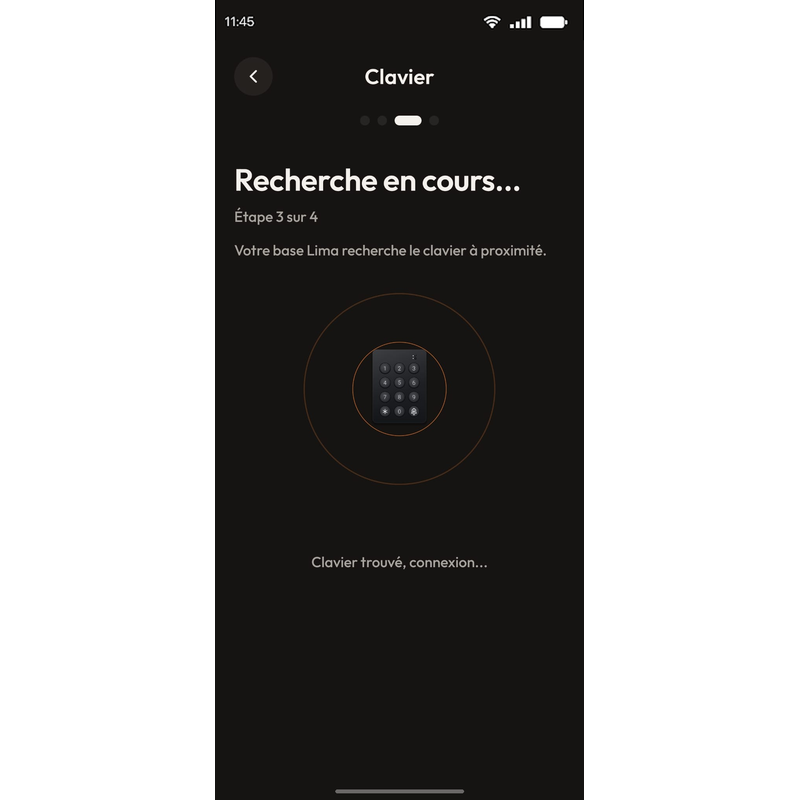
  5. The Lima Shield searches for the keypad nearby. When it finds it, the connection is made automatically.

    Figure 53: Searching for the keypad, step 3 of 4
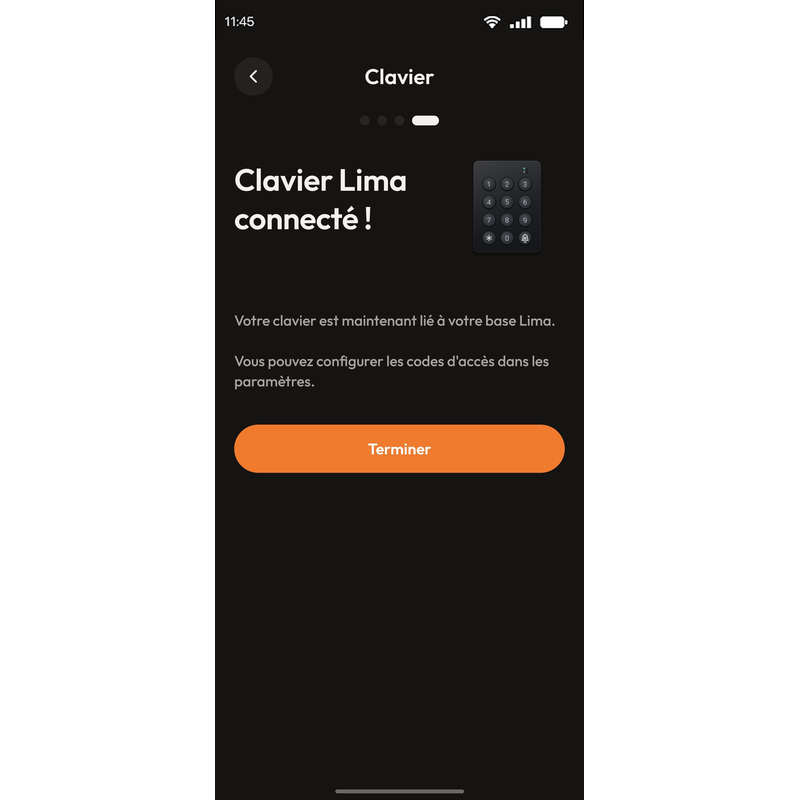
  6. Tap “Finish”. The keypad appears in your accessories, where you manage its codes under “Access codes”.

    Figure 54: Keypad connected
    Figure 55: The remote control and the keypad in the accessories

To be guided screen by screen, follow the step-by-step guide to adding the remote control or the keypad.

Once the keypad is added, see how to arm and disarm with the code keypad.

Manage

How do I arm and disarm with the code keypad?

The code keypad arms and disarms the Lima Shield without a phone. It works with your personal six-digit code, set in “Settings”, then “Accessories” (see how to add a code keypad).

Arming and disarming work differently: disarming only requires the code.

To arm

  1. Enter the six digits of your code.

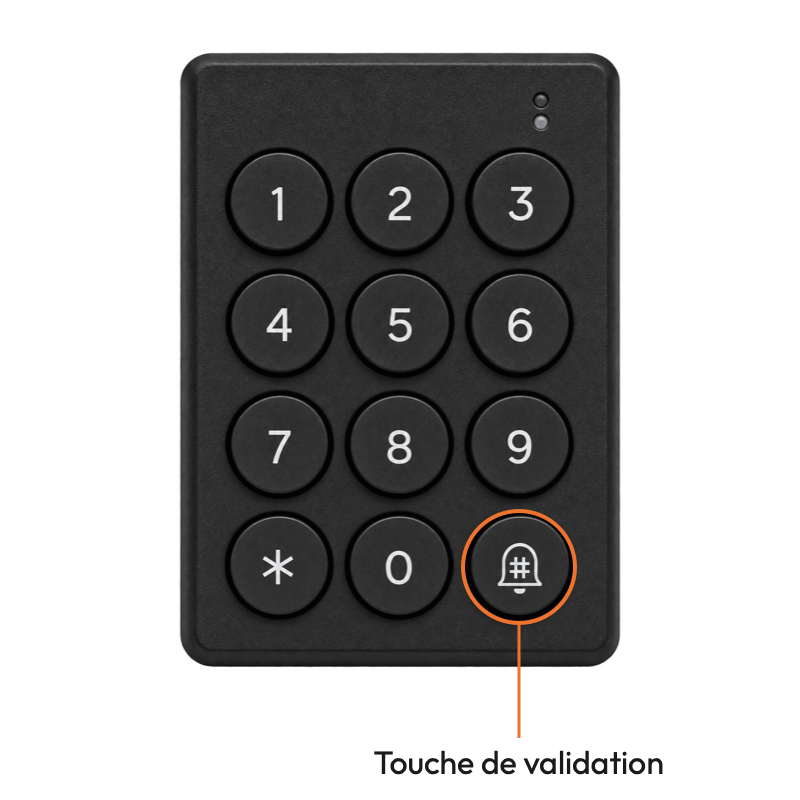
  2. Press the confirm key, at the bottom right of the keypad: it is marked with a bell and a hash sign.

    Figure 33: The code keypad and its confirm key, at the bottom right, marked with a bell and a hash sign
    figure 33

To disarm

  1. Enter the six digits of your code.

  2. No need to press the star key afterwards.

When you arrive at a protected site, enter your code during the 10-second delay, before the siren goes off.

Check that the command went through

Look at the Lima Shield's status LED: solid red means it is armed; solid white means it is disarmed (see what the LED colour means).

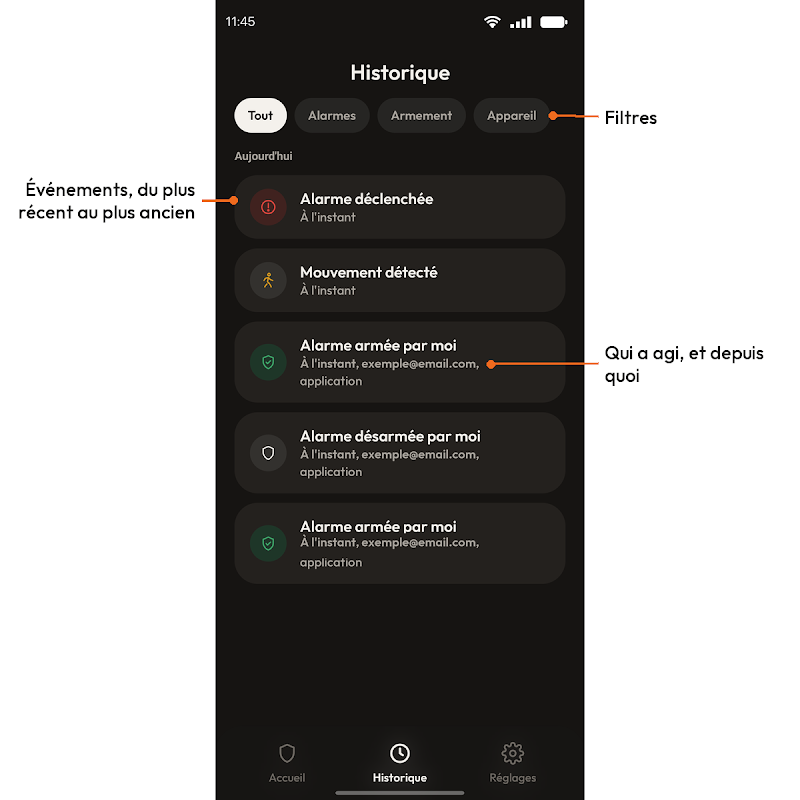
If the Lima Shield cannot be seen from the keypad, the “Home” screen of the app shows its status, and the “History” tab also lists arming and disarming done from the keypad.

Manage

How do I add another Lima Shield?

In “Settings”, tap “Change”, then “Add a Shield”. Then follow the same steps as for installation (see how to install the Lima Shield). Each Lima Shield protects 70 to 100 m², depending on the configuration and the acoustics of the space.

To switch from one Lima Shield to another in the app, tap “Change” in “Settings”.

Your Lima Shield units can be managed one by one, or work together in coordination: each one communicates with the others.

Manage

How do I turn off or reset the Lima Shield?

Turn off the Lima Shield

In “Settings”, tap “Turn off the Shield”: this silences the siren and stops monitoring. First disarm the Lima Shield and stay next to it. To turn it back on, press and hold the button on the back of the Lima Shield for at least 3 seconds.

Figure 27: The start button on the back of the Lima Shield
figure 27

Reset the Lima Shield

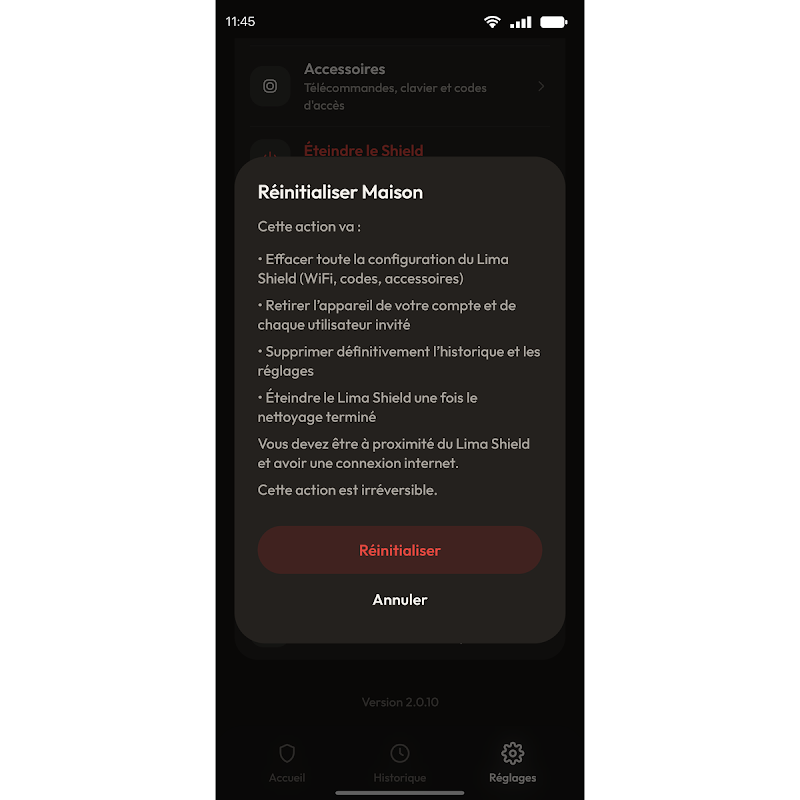
In “Settings”, tap “Reset the Shield” to restore it to its factory settings, for example before passing it on to someone else. First disarm it and stay next to it, with an Internet connection.

Resetting erases the entire Lima Shield configuration (Wi-Fi, codes, accessories), removes it from your account and from the accounts of anyone you invited, permanently deletes the history and settings, then turns it off.

Figure 28: The Lima Shield reset screen

Learn more

What happens in the event of a power or Internet outage?

The Lima Shield carries on protecting even without power or Internet: detection and triggering happen on the device itself.

Power outage
Its internal battery takes over: up to 1 month, and up to 3 months with the optional secondary batteries
Internet outage
The built-in 4G takes over to alert you

Learn more

Can a pet or a child trigger the alarm?

It is very unlikely. The Lima Shield's sensors are designed to recognise small frames and low-level movement: a cat or a young child has virtually no chance of triggering it.

Since no sensor is infallible, two safeguards come before any sound is emitted: the warning beeps, if you have turned them on, and the 10-second delay, which gives you time to disarm.

Learn more

Is the Lima Shield's sound dangerous?

The Lima Shield is designed to make intruders flee, not to injure them. A very brief exposure causes at most temporary discomfort, without lasting effects. No substance is released, and there is nothing to clean up.

Before any sound
The warning beeps, if you have turned them on, then a 10-second delay to disarm
Duration
Adjustable in the app, “Alarm” tab; the sound alternates with pauses, in sequence
Power
Adjustable from 86 to 138 dB

The sound test can be very loud. Warn anyone nearby and move away from the Lima Shield before starting a test. Do not run a test close to anyone's ears.
Troubleshoot

What should I do if there is a problem?

Start with these checks. If they are not enough, our support team will help.
No Lima Shield appears over Bluetooth

Check the power supply, that the LED is lit white, that the phone's Bluetooth is turned on and that you are within 5 metres, in the same room. Then tap “Search again”. Also check that the Lima Shield is not already installed on another account.

Your Wi-Fi network does not appear, or the connection fails

The Lima Shield only picks up 2.4 GHz Wi-Fi: check that your router broadcasts on 2.4 GHz, and check the password. You can also connect it to your router with an Ethernet cable.

The siren went off by mistake

Tap “Stop siren” in the app, or disarm with the code keypad, a badge or the remote control. The alarm then remains visible in the “History” tab. See how to stop the siren.

You are not receiving notifications

In your phone's settings, check that notifications are allowed for the Lima Shield Connect app, and that the phone is connected to the Internet.

The invited person cannot see your Lima Shield

They must create their account in the app using exactly the email address you sent the invitation to, then tap “Accept invitation”. See how to invite someone.

The Lima Shield is managed from another account

Only the administrator account, the one used to install the Lima Shield, can change its settings. Invited people can arm it, disarm it and view the history.

The Lima Shield is shown as unreachable

Check the power supply and network availability. If the problem persists, contact support with the serial number.

The problem persists

In “Settings”, then “This device”, use “Share logs” if support asks you to.

Contact support

Keep the serial number (SN) handy: it is shown on the label at the bottom of the Lima Shield, above the connectors.